Incorporating technology into the classroom, such as Chromebooks, proves extremely valuable for student learning and assignment completion, but it also introduces new challenges.

If your school has recently invested in a set of Chromebooks for each classroom (or if you’ve generously provided them for your students), you might encounter the predicament of efficiently organizing and charging these devices. This is where the concept of a DIY Chromebook charging station comes into play.
Each Chromebook isn’t that big, but when you have a whole class set (or even a partial set), finding a way to safely organize and charge the Chromebooks while ensuring that students and adults in the room can quickly access them when needed is challenging. Considering factors like limited access to power outlets and the necessity for an efficient charging solution adds an extra layer of complexity to the task.
#chromebooks getting organized and started checking out to Ss (for in-library) use! https://t.co/9lDHx99z7A pic.twitter.com/HGvvAnkxct
— Colleen Graves (@gravescolleen) January 26, 2016
Chromebook charging carts can be costly, but they aren’t the sole choice for organizing and managing Chromebooks in your classroom. Fortunately, alternative solutions are available. Did you know that with a few materials and a little creativity, you can make a DIY charging station?
Today, we’re going to explore crafting a charging station for your classroom. In addition to the creative ideas and step-by-step instructions, you’ll learn helpful strategies for effective Chromebook management. You’ll learn:
- Why a Chromebook charging station is a necessary addition to a classroom →
- Key components that should be included in a Chromebook charging station →
- 13 DIY ideas to make your own Chromebook charging station for your classroom →
4 Reasons Why You Need a Chromebook Charging Station in Your Classroom
Just as a tablet and cell phone charging stations make it possible to keep tablets and phones charged, organized, and ready for use, Chromebook charging stations offer the same benefits for Chromebooks in a classroom (read more about tablet charging stations here and cell phone charging stations here).

A Chromebook cart is a necessary addition to any classroom for a few different reasons. Some of these key reasons include:
1. Protection of Expensive Technology
Investing in technology is not cheap. Whether you purchased your own Chromebooks or they were purchased by your school, you want to do everything you can to protect them from damage. A secure charging station will keep Chromebooks off of tables or counters where they could accidentally fall or be pushed to the ground.

2. Ease of Access
With a Chromebook charging station, you, your students, and other adults in the room can easily grab a Chromebook when needed. The Chromebooks can all be stored in the same central location, which may not be possible without a charging station.
3. Management of Cords
Managing 20 or 30 charging cables without a charging station sounds like a nightmare. The cords will become tangled, could pose a tripping hazard, and, if pulled, could result in a Chromebook falling on the floor. With a charging station, the power cord for each Chromebook will be tucked away to prevent these hazards, while still allowing you easy access when it is time to plug in the device.

4. Mobility
If you need to be able to take your Chromebooks from one classroom to another, you can add wheels to your charging station. Wheeling a cart can be much easier than trying to carry all the Chromebooks in a stack, and much safer than trusting kids to carry an expensive piece of technology in the halls.
Stacking more than 7 Chromebooks together may result in damage (plus, the stack may become unstable and more likely to fall over).
What a Great DIY Chromebook Charging Station Should Include
When crafting a superior DIY Chromebook charging station and contemplating how to store Chromebooks in a classroom, several key elements contribute to its functionality and efficiency. Ensuring that your custom creation meets these essentials enhances the overall user experience:
- Cord Management System: Implement a well-thought-out cord management system to prevent tangling and maintain a neat and organized appearance. This not only enhances the visual appeal but also simplifies the charging process.
- Power Strip Inclusion: A crucial component of any effective charging station is a power strip. Incorporate a reliable power strip to facilitate simultaneous charging of multiple Chromebooks, streamlining the charging process.
- Labels for Organization: Enhance organizational efficiency by incorporating labels. Mark both the cords and each slot, especially if your Chromebooks are numbered. This ensures easy identification and hassle-free handling of devices.
- Dust Cover (Optional): Consider adding a dust cover to your charging station for added protection. This optional feature safeguards the Chromebooks from dust and debris, ensuring they remain in optimal condition between uses.
- Mobility with Wheels: For added convenience, especially in dynamic environments, include wheels in your design. This allows for easy mobility, enabling you to move the charging station effortlessly to different locations as needed.
By integrating these elements into your DIY Chromebook charging station, you create a comprehensive and user-friendly solution that not only meets your charging needs but also adds practical features for enhanced functionality and longevity.
I have found some unusual and interesting ideas that you will definitely like.
| Ideas | Time needed | Materials needed |
| 1. Using a Document Tray | 10 to 15 minutes | Create a charging station with document trays, Chromebook charging cables, and zip ties, securing them together and connecting them to a power strip. |
| 2. Using an IKEA PS Cabinet | 2 hours | Transform an IKEA PS cabinet into a charging hub by attaching power strips, desk organizers, and cord clips for efficient Chromebook storage. |
| 3. Using a Bookcase | 1 hour | Fashion an 8-bay Chromebook charging station from a two-shelf bookcase, power strip, bookends, wire clips, screws, and tape. |
| 4. Using a Closet Organizer | 15 to 20 minutes | Utilize two 2-shelf closet organizers, tape or cord clips, and a power strip to easily store and charge up to eight Chromebooks. |
| 5. Using a Rolling Table | 1 hour | Craft a mobile Chromebook storage cart with a small rolling table, dish racks, power strips, zip ties, and cord clips for easy accessibility. |
| 6. Using Wood Boards | 2 hours | Build wall-mounted charging shelves for a limited number of Chromebooks using wood boards, brackets, screws, and proper ventilation, with the option for a mounted door. |
| 7. Using a Wooden Literature Sorter | 1 to 2 hours | Repurpose a wooden literature sorter into a Chromebook storage shelf with hooks, power strips, and labeling for an organized charging solution. |
| 8. Using a Letter Tray | 15 to 30 minutes | Establish an affordable Chromebook storage station by threading power cords through a letter tray and securing them with cord clips. |
| 9. Using a Pallet | 1 hour | Create a pallet-based charging station by repurposing scrap wood, adding drilled holes for cords, and optionally mounting it for wall or table use. |
| 10. Using a Cardboard Desk Organizer | 20 to 30 minutes | Assemble a desk organizer charging station using a cardboard organizer, a small power strip, an X-Acto knife, scissors, and tape for a quick and inexpensive solution. |
| 11. Using Decoupage Effect | 1 hour | Enhance a DIY charging station storage box with a decoupage effect, incorporating fabric spray paint, Mod Podge, and washers for a vintage and personalized touch. |
| 12. Using a Woven Basket | 10 to 15 minutes | Craft a simple charging basket with a woven basket, power strip, and zip ties for a straightforward and functional Chromebook storage solution. |
| 13. Using Book Bins and a Shoebox | 2 to 3 hours | Combine three book bins and a plastic shoebox to create a stylish charging station, featuring spray-painted elements and a power strip attached with hot glue for a practical and aesthetically pleasing solution. |
Below, you’ll find 13 brilliant ideas on how to craft charging stations starting with…
1. Using a Document Tray
Creating a simple and efficient charging station for Chromebooks can be accomplished in just 10 to 15 minutes with basic materials and a straightforward process. For this project, you’ll need document trays, Chromebook charging cables, and zip ties.
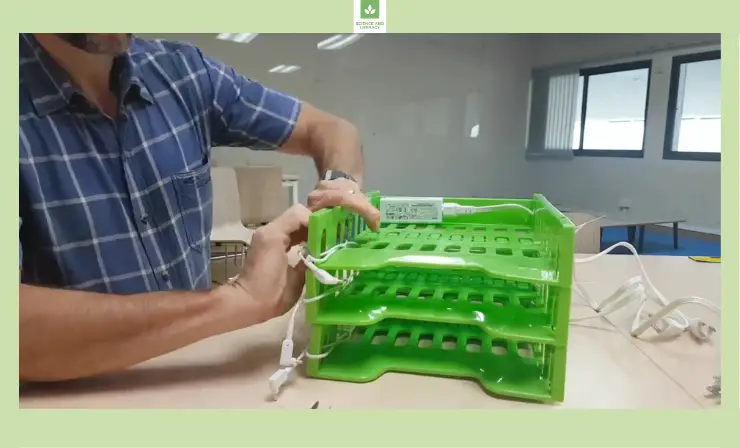
Materials Needed: document trays, Chromebook charging cables, zip ties.
Time Needed: 10 to 15 minutes
How to Make it:
- Prepare Materials: Gather document trays, Chromebook charging cables, and zip ties.
- Weave Power Cables: Thread the power cable for each Chromebook through the document trays, ensuring a neat arrangement.
- Secure with Zip Ties: Use zip ties to secure the power cables to the end of each tray, leaving the plug end protruding from the back.
- Stack Trays: Stack three or four document trays together with woven power cords.
- Secure with Zip Ties: Use additional zip ties to secure the stacked trays, ensuring stability.
- Connect to Power Strip: Attach the cords to a power strip, creating a centralized charging point.
- Final Touch: Ensure the plug ends are accessible at the back of the trays for easy connection to Chromebooks.
For a visual guide, watch the accompanying video to follow a step-by-step demonstration. This quick and efficient charging station offers an organized solution for managing Chromebooks in any setting.
2. Using an IKEA PS Cabinet
Creating a customized and efficient Chromebook charging station can be accomplished with a two-hour time investment and a few essential materials. For this project, you’ll need an IKEA PS cabinet, three power strips, a drill, zip ties, and three 8-slot vertical desk organizers.
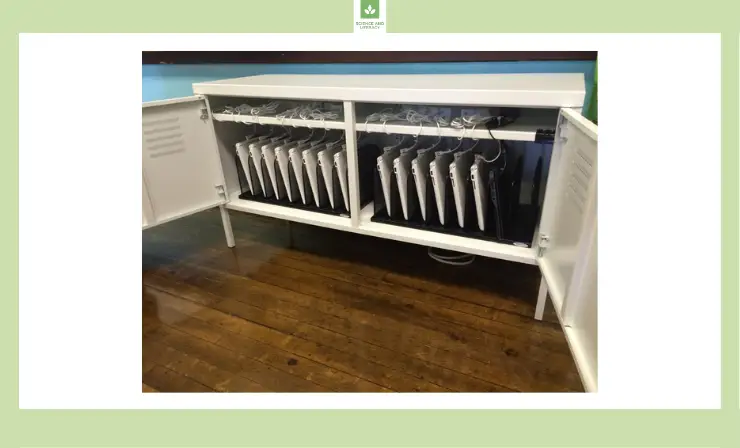
Materials Needed: IKEA PS cabinet, three power strips, drill, zip ties, three 8-slot vertical desk organizers, cord clips, and labels.
Time Needed: 2 hours
How to Make it:
- Prepare IKEA PS Cabinet: Position the IKEA PS cabinet in the desired location, ensuring accessibility to power outlets.
- Connect Power Strips: Using a drill, attach three power strips to the back of the cabinet securely with zip ties.
- Thread Charging Cords: Feed the charging cords for each Chromebook through existing holes in the back of the cabinet, connecting the ends to the power strips.
- Organize with Desk Organizers: Place three 8-slot vertical desk organizers inside the cabinet and secure them to the base for stability.
- Install Cord Clips: Attach cord clips to the desk organizers for efficient cord management.
- Zip Tie Cords: Secure the charging cords to the top shelf using zip ties, ensuring the ends hang over the desk organizer for easy access.
- Label for Organization: Optionally, label both the slots on the organizer and the power strip to identify which Chromebook corresponds to each slot.
- Streamlined Charging: Enjoy a well-organized charging station where each Chromebook has a designated spot, facilitating easy identification and hassle-free unplugging when needed.

Within two hours, you’ll have a thoughtfully designed and efficient charging station, ensuring your Chromebooks remain charged and readily available for use.
3. Using a Bookcase
Crafting a functional 8-bay Chromebook charging station is a straightforward project that requires only an hour of your time and a set of readily available materials. For this undertaking, gather a two-shelf bookcase, a power strip, smooth enameled bookends, wire clips, a non-slip mat, screws, and tape.
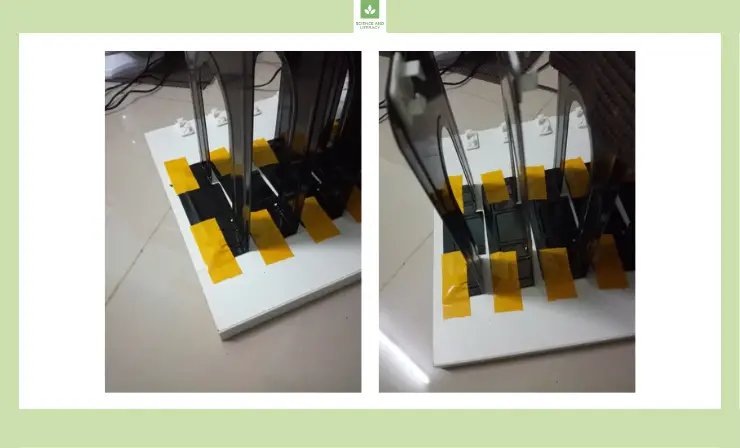
Materials Needed: two-shelf bookcase, power strip, smooth enameled bookends, wire clips, non-slip mat, screws, tape.
Time Needed: 1 hour
How to Make it:
- Prepare Bookcase: Position the two-shelf bookcase in the desired location, ensuring it is accessible to power outlets.
- Attach Bookends: Using screws, saw away the flat flap of each smooth enameled bookend, and drill holes to secure the wider edge onto the bookcase. Space them out adequately for each Chromebook.
- Secure Bookends: Screw the modified bookends onto the shelf of the bookcase, creating designated spaces for each Chromebook.
- Wire Management: Use wire clips to attach the ends of the power cords to the bookends, ensuring a tidy arrangement.
- Route Power Cords: Direct the other ends of the power cords down to the lower shelf of the bookcase.
- Install Power Strip: Place a power strip on the lower shelf and plug in the Chromebooks, providing a centralized and organized charging solution.
- Optional Non-Slip Mat: If desired, place a non-slip mat on the lower shelf to add stability and protect the Chromebooks.

In just one hour, you’ll have a well-organized and efficient charging station, making it easy to keep multiple Chromebooks charged and ready for use.
4. Using a Closet Organizer
In just 15 to 20 minutes, you can create a convenient and organized charging station for eight Chromebooks using two 2-shelf closet organizers, each approximately 24 inches wide. This quick and easy project requires minimal materials, making it an efficient solution.

Materials Needed: two 2-shelf closet organizers (24 inches wide each), power strip, tape, or cord clips.
Time Needed: 15 to 20 minutes
How to Make it:
- Position Closet Organizers: Place the two 2-shelf closet organizers in a suitable location, ensuring they are easily accessible.
- Determine Charging Spaces: Allocate each shelf to hold two Chromebooks, providing a total storage capacity for eight devices.
- Prepare Charging Cords: Tape the charging cords for each Chromebook in the designated space where it will sit during charging.
- Use Cord Clips (Optional): Alternatively, opt for cord clips to secure the charging cords instead of tape, providing flexibility and ease of adjustment.
- Plug into Power Strip: Connect the ends of the charging cords to a power strip, creating a centralized charging point.
- Tidy Arrangement: Ensure the cords are neatly arranged, preventing tangling and maintaining an organized appearance.
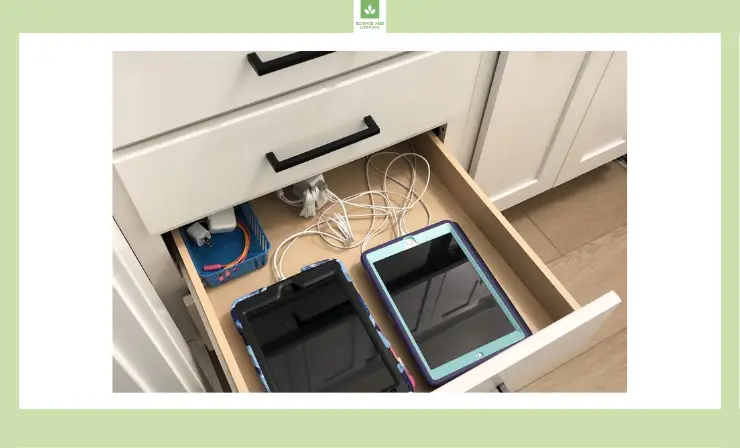
This straightforward approach offers a quick solution for schools or workplaces needing a compact and efficient charging station for multiple Chromebooks. The flexibility of using either tape or cord clips provides customization based on individual preferences.
5. Using a Rolling Table
In just one hour, you can create a practical and mobile Chromebook storage cart that facilitates easy accessibility and organization. To embark on this project, gather a small rolling table or desk, simple metal dish racks, and power strips.
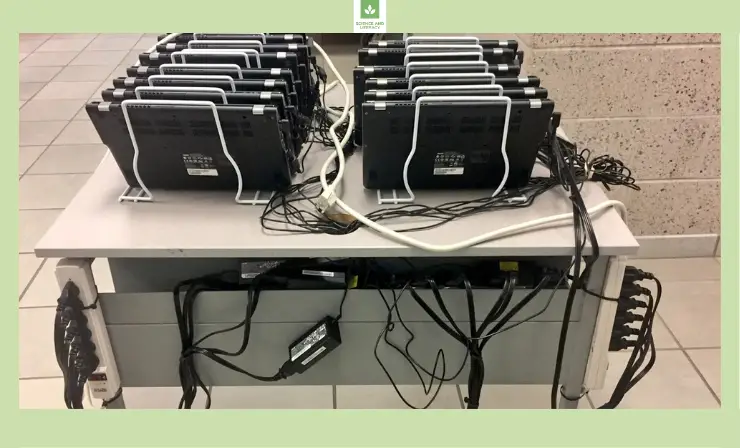
Materials Needed: small rolling table or desk, simple metal dish racks, power strips, zip ties, and cord clips.
Time Needed: 1 hour
How to Make it:
- Select Rolling Table or Desk: Choose a small rolling table or desk suitable for accommodating the desired number of Chromebooks.
- Prepare Dish Racks: Secure the simple metal dish racks to the cart, ensuring they are stable and well-attached.
- Connect Power Strips: Use zip ties to connect the power strips to the legs or sides of the table, creating a centralized power source.
- Utilize Cord Clips: Attach cord clips to the dish racks for an organized arrangement of power cords.
- Place Chromebooks: Lay the Chromebooks between the slots on the dish racks, ensuring they are evenly spaced for easy access.
- Connect Power Cords: Connect the power cords of the Chromebooks to the power strips, providing a straightforward and efficient charging setup.
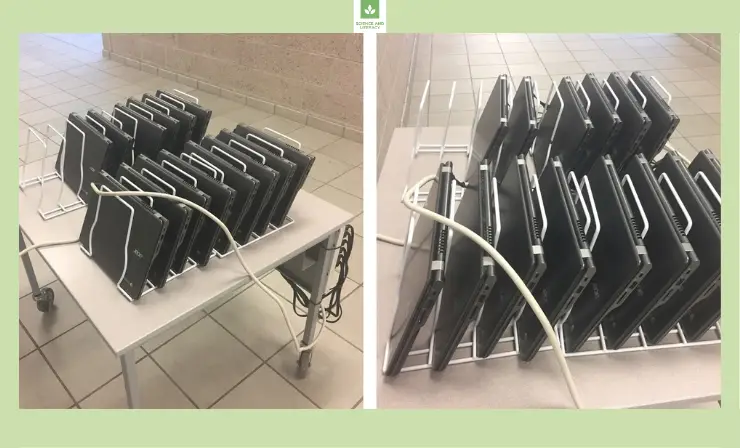
With the added convenience of wheels, this Chromebook storage cart offers mobility, allowing you to easily transport and share devices within a classroom or workspace. The combination of dish racks and cord clips ensures a tidy and accessible arrangement, making the charging process hassle-free.
6. Using Wood Boards
In a span of two hours, you can craft a custom wall-mounted charging solution for Chromebooks in your classroom. This particular idea is ideal for classrooms with a limited number of devices and where wall mounting is permissible.

Materials Needed: wood boards, screws, drill, ventilation holes, brackets, door.
Time Needed: 2 hours
How to Make it:
- Prepare Wood Boards: Cut the wood boards to the appropriate size to securely hold each Chromebook, ensuring a snug fit.
- Drill Wire Holes: Create holes in the wood boards to run wires, allowing for a clean and organized wiring setup.
- Add Ventilation Holes: Drill ventilation holes in strategic locations to prevent overheating of the Chromebooks during charging.
- Assemble with Brackets: Use brackets to assemble the charging shelf, providing stability and structural support.
- Mount to the Wall: Securely mount the assembled charging shelf to the wall, ensuring it is level and securely anchored.
- Incorporate a Door: Enhance the charging station by adding a door, concealing the cables for a tidy and organized appearance.
For a visual guide and additional insights, watch the accompanying video tutorial provided above, which offers a step-by-step demonstration of the entire process.
By following these steps, you’ll create an efficient, space-saving, and visually appealing wall-mounted charging solution suitable for classrooms with specific storage and device limitations.
7. Using a Wooden Literature Sorter
In just 1 to 2 hours, you can craft a practical DIY storage shelf specifically designed for Chromebooks using a wooden literature sorter or a modified small bookshelf. This project offers a versatile solution suitable for various organizational needs.
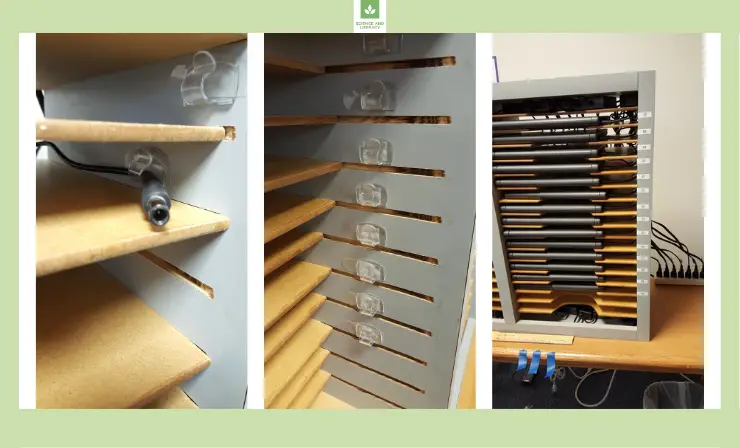
Materials Needed: wooden literature sorter or small bookshelf, power strips, velcro or Command strips, hooks or wire clips, screws, and number labels (optional).
Time Needed: 1 to 2 hours
How to Make it:
- Select Storage Unit: Choose a wooden literature sorter or modify a small bookshelf to suit your preferences and available materials.
- Drill Cord Holes: Drill holes in the back of the chosen storage unit for each Chromebook plug, ensuring neat and efficient cord management.
- Attach Hooks or Wire Clips: Affix hooks or wire clips to the front of each shelf, providing secure and accessible storage for Chromebooks.
- Install Power Strips: Using Velcro or Command strips, attach power strips to the back of the storage unit, ensuring a stable connection.
- Connect Power Cords: Hook up the charging cords to the power strips, creating a centralized and organized charging system.
- Optional Number Labels: If desired, label each slot with numbers for easy identification, ensuring Chromebooks stay organized and can be easily located.
This DIY storage shelf offers a customizable and efficient solution for Chromebook organization, allowing for quick access, tidy cord management, and optional numbering for enhanced organization.

8. Using a Letter Tray
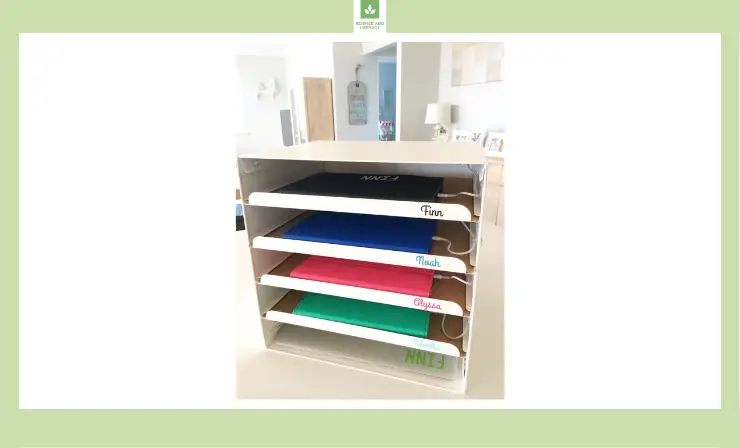
In just 15 to 30 minutes, you can create a straightforward and budget-friendly Chromebook storage station using a letter tray. This quick DIY project offers an easy solution for organizing and charging Chromebooks without breaking the bank.

Materials Needed: letter tray, cord clips, power cords.
Time Needed: 15 to 30 minutes
How to Make it:
- Position Letter Tray: Choose a letter tray suitable for holding the desired number of Chromebooks and place it in a convenient location.
- Run Power Cords: Thread the power cords of the Chromebooks through the back of the letter tray, ensuring a neat and organized arrangement.
- Secure with Cord Clips: Use cord clips to secure the power cords at the front of the tray, making them easily accessible for plugging and unplugging.
- Tidy Arrangement: Ensure the cords are neatly arranged within the cord clips, preventing tangling and maintaining an organized appearance.
This uncomplicated DIY approach provides an inexpensive and efficient solution for smaller-scale Chromebook storage needs, ensuring a tidy and accessible charging station within a short timeframe. The use of a letter tray, combined with cord clips, simplifies the charging process while keeping the overall setup neat and accessible. Additionally, this method promotes a clutter-free and user-friendly environment for hassle-free device management.
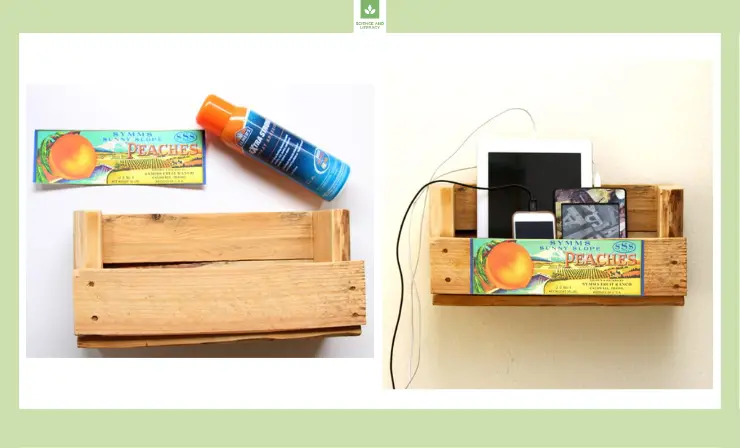
9. Using a Pallet
Crafting a personalized and functional storage station for Chromebooks is a rewarding project that takes approximately 1 hour to complete. This DIY endeavor utilizes scrap wood from a pallet, making it a cost-effective solution for those looking to organize and charge between one and four Chromebooks.

Materials Needed: scrap wood from a pallet, circular saw or jigsaw, pry bar, decorative picture or design (optional).
Time Needed: 1 hour
How to Make it:
- Select Pallet Section: Choose a pallet section suitable for the desired size of your charging station. Larger sections can accommodate more Chromebooks.
- Cut Pallet End: Using a circular saw or jigsaw, cut off the end section of the pallet, creating the main structure for your charging station.
- Strengthen Back and Bottom: Enhance the stability of your charging station by using a pry bar to remove an additional board from another pallet section. Use this board to create a secure bottom and reinforce the back, forming a small enclosed shelf.
- Drill Charging Holes: Create holes in the bottom of the pallet to thread the charging cords, ensuring a tidy and organized arrangement.
- Add Decorative Touch (Optional): Personalize your charging station by incorporating a decorative picture or design to the front, adding character to the finished product.
- Choose Mounting Option: Decide whether to mount the charging station to the wall for a space-saving solution or leave it on a desk or table, depending on your preference and available space.
This DIY charging station not only provides a practical solution for organizing Chromebooks but also allows for creative customization, making it a functional and aesthetically pleasing addition to any classroom or workspace.
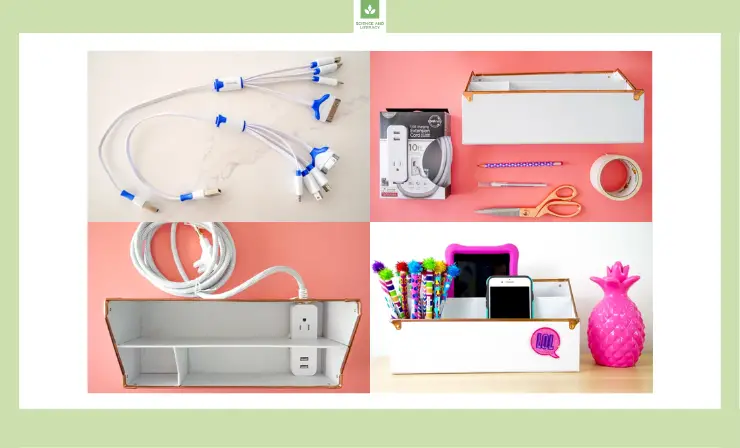
10. Using a Cardboard Desk Organizer
In just 20 to 30 minutes, you can craft a practical and versatile desk organizer charging station for your Chromebooks. This DIY project requires a cardboard desk organizer, a small power strip, an X-Acto knife, scissors, and tape, offering a quick and efficient solution for organized device charging.

Materials Needed: cardboard desk organizer, small power strip, X-Acto knife, scissors, tape.
Time Needed: 20 to 30 minutes
How to Make it:
- Prepare Desk Organizer: Choose a cardboard desk organizer suitable for your charging needs and place it on your desk or tabletop.
- Create Cord Flap: Using an X-Acto knife, carefully create a flap in the back of the organizer to accommodate the cord for the power strip. This allows for a clean and organized cord management system.
- Divider Flap: Cut a flap through the divider in the organizer, providing a pathway for the power strip and cords to be neatly threaded.
- Insert Power Strip: Slide the power strip into the bottom of the organizer through the flap you created, ensuring a secure fit.
- Thread Cord Through Flap: Thread the power strip cord through the back flap, maintaining a tidy appearance.
- Plug in and Connect: Plug the power strip into the wall outlet, and connect the Chromebook cables to the power strip, creating a centralized and organized charging hub.
- Optional Device Charging: Utilize the organizer for charging other small devices, such as phones or tablets, for added convenience.
This DIY desk organizer charging station not only streamlines the charging process for Chromebooks but also provides a versatile solution for keeping various electronic devices charged and organized within a short timeframe.
11. Using Decoupage Effect
In just one hour, immerse yourself in the world of decoupage with this delightful DIY charging station storage box. This project is perfect for enthusiasts of decoupage and promises not only functionality but a touch of vintage charm.
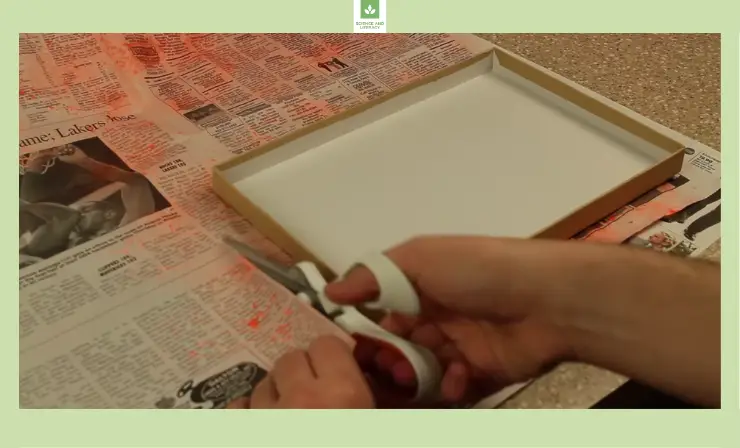
Materials Needed: storage box, fabric spray paint, newspaper, Mod Podge, sealer coat, four washers, drill or cutting tool, and charging cables.
Time Needed: 1 hour
How to Make it:
- Prepare Storage Box: Begin with a plain storage box as your canvas for creativity.
- Vintage Effect: Use fabric spray paint over newspaper to achieve a vintage effect on the box. Allow it to dry naturally or expedite the process with a hairdryer.
- Decoupage Magic: Apply Mod Podge to cover both the box and its lid with the newspaper, creating a textured and visually appealing surface.
- Sealer Coat: Add a sealer coat to protect and enhance the longevity of your decoupage masterpiece.
- Washer Attachment: Attach four washers to one side of the box. Using a drill or cutting tool, create holes in the center of each washer to serve as a conduit for feeding charging cables through.
- Cable Management: Thread the charging cables through the holes in the washers, ensuring a neat and organized arrangement.
For a comprehensive visual guide, refer to the accompanying video tutorial, which provides step-by-step instructions for creating your unique and personalized charging station storage box.
This DIY project not only transforms a basic storage box into a stylish charging station but also allows for artistic expression through the decoupage technique. In just an hour, you can enjoy the fusion of practicality and aesthetics in this charming creation.
12. Using a Woven Basket
In a quick and efficient 10 to 15 minutes, create a functional DIY charging basket that elegantly organizes your Chromebooks. This simple project requires only a woven basket, a power strip, and some zip ties, making it an accessible solution for device charging.
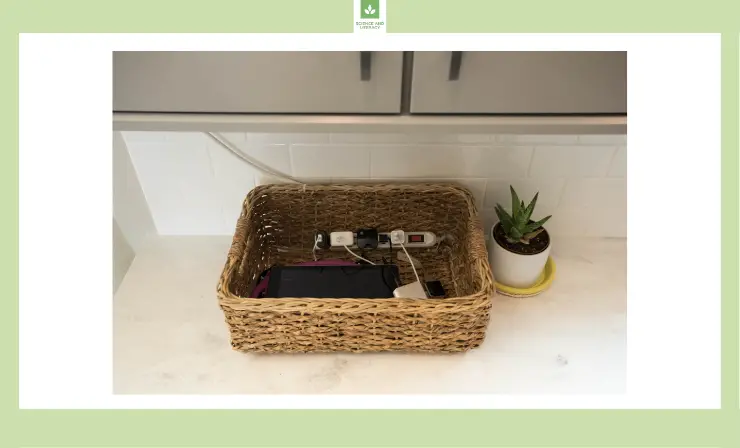
Materials Needed: woven basket, power strip, zip ties, Chromebooks.
Time Needed: 10 to 15 minutes
How to Make it:
- Select a Suitable Basket: Choose a woven basket that is sufficiently large to accommodate the number of Chromebooks you wish to charge. Ensure it provides ample space for easy access.
- Prepare the Power Strip: Feed the cord for the power strip through the basket, positioning it strategically for a tidy and organized appearance.
- Secure with Zip Ties: Use zip ties to secure the power strip cord to the basket, preventing any movement and ensuring a stable setup.
- Place Chromebooks: Gently place your Chromebooks into the basket, arranging them neatly for optimal charging efficiency.
- Connect to Power Strip: Plug the Chromebook charging cables into the power strip, creating a centralized charging point within the basket.
For a more detailed and visual guide, refer to the accompanying video tutorial, which provides step-by-step instructions on creating your DIY charging basket.
This DIY charging solution not only simplifies device organization but also adds an aesthetic touch to the woven basket. In just a short timeframe, you’ll have a functional and visually appealing charging station for your Chromebooks.
13. Using Book Bins and a Shoebox
Embark on a creative journey to craft a personalized charging station for your Chromebooks, investing 2 to 3 hours in this engaging DIY project. Gather your materials, including three book bins, a plastic shoebox storage container, spray paint, a power strip, an X-Acto knife, hot glue, and E6000 adhesive.
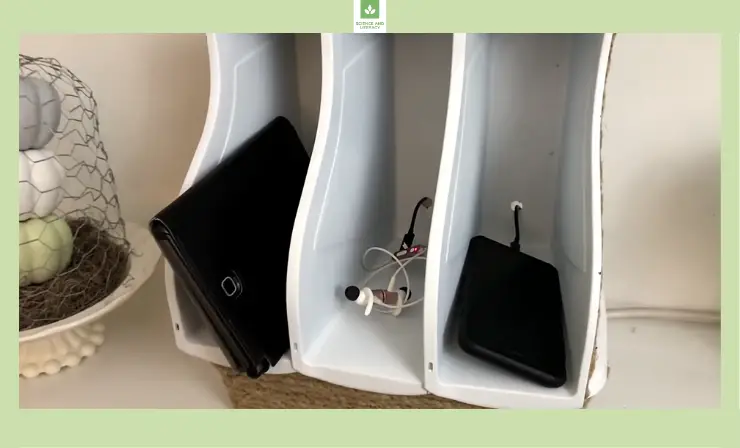
Materials Needed: three book bins, plastic shoebox storage container, spray paint, power strip, X-Acto knife, hot glue, E6000 adhesive, nautical rope, or other decorative materials (optional).
Time Needed: 2 to 3 hours
How to Make it:
- Drill Holes in Book Bins: Begin by drilling a hole in the back of each book bin, ensuring a neat entry point for the Chromebook power cords.
- Spray Paint: Transform the book bins and the lid of the storage container with a burst of color by spray painting them in your desired shade. Allow sufficient drying time.
- Prepare Power Strip Cutout: Trace the power strip outline on the side of the plastic shoebox. Use an X-Acto knife to cut out the traced area, and employ hot glue to secure the power strip to the box’s side, concealing the plugs inside.
- Assemble with Hot Glue and E6000: Attach the three book bins to the lid of the storage container, positioning them on their side with the long side down. Use hot glue and E6000 adhesive for a sturdy and enduring connection.
- Optional Decorative Touch: Enhance the aesthetics by wrapping the plastic bin and the book bin sides with nautical rope or other decorative materials for a polished look.
- Thread Power Cords: Thread the small ends of the Chromebook power cords through the back of the book bin, ensuring a seamless and organized appearance.
- Connect to Power Strip: Plug the other ends of the power cords into the power strip, creating a centralized charging hub within your stylish and functional DIY charging station.
For detailed visual guidance, refer to the accompanying video tutorial, which offers step-by-step instructions and creative insights.
This DIY charging station not only streamlines device organization but also allows for creative expression through color and optional decorative touches. Spend a few hours crafting this unique and personalized solution for your Chromebooks.
Useful Resources
- How to Store Chromebook in the Classroom
- 5 Reasons Why Chromebooks in the Classroom Benefits Students
- Laptop vs. Chromebook: How Are They Different
- 4 Tech Challenges in 1:1 Learning Classrooms
Final Thoughts
From providing students with access to a wealth of knowledge and information for research, helping students improve their technological skills and prepare for the future, and engaging students in genuine learning experiences and tasks, such as digital storytelling (learn more about digital storytelling in this article) and so much more, Chromebooks can be such a powerful tool in the classroom.
Using one of the DIY Chromebook charging station ideas we shared can help you accomplish all of these goals and ensure your Chromebooks are ready and waiting when you need them for instruction!
- Overview of 22 Low-Code Agencies for MVP, Web, or Mobile App Development - October 23, 2024
- Tips to Inspire Your Young Child to Pursue a Career in Nursing - July 24, 2024
- How Parents Can Advocate for Their Children’s Journey into Forensic Nursing - July 24, 2024

Wow! These are some great ideas! I’ve been looking for the perfect way to manage the tangled mess of cords that always seems to take over my classroom. Some of my colleagues have wheeled carts, do you think that is really necessary?
I don’t think a wheeled cart is a necessity unless you frequently move from one classroom to another. If you pretty much remain in your classroom, placing one of these organizers in a centralized location should provide your students with easy access to their Chromebook and help you keep everything neat and organized.