Yarn crafts offer a wonderful opportunity for preschool children to explore their creativity while developing essential motor skills. With a simple skein, the possibilities are vast, ranging from delightful decorations to playful toys. These 28 easy projects are designed specifically for young children, providing safe, engaging, and educational activities that parents, teachers, and caregivers can easily implement at home or in the classroom.
Each craft is tailored to be both fun and beneficial, helping children improve their fine motor skills, hand-eye coordination, and problem-solving abilities. Furthermore, these projects encourage artistic expression and creativity in young learners, allowing them to experience the joy of making something unique with their own hands. Whether it’s weaving a bracelet, creating a colorful painting, or making a soft doll, these activities are perfect for little hands and big imaginations.
CARDBOARD YARN APPLES – his cute little craft is great for preschool age kids, but would work for older kids too. #kidsactivities #kidscrafts #fall https://t.co/dsqZ47KEwZ pic.twitter.com/vOiD4KL5Db
— One Little Project (@1littleproject) October 21, 2019
The crafts included are diverse, ranging from simple wrapping and cutting projects to more involved weaving and sewing tasks. This ensures a broad spectrum of experiences that cater to different skill levels and interests. By engaging with these crafts, children not only learn about colors, shapes, and textures but also gain a sense of accomplishment and confidence as they complete each project.
Let’s dive into the colorful world of yarn with these 28 enchanting crafts that are sure to captivate and educate preschoolers.
| Experiment | Difficulty level | Cost | Description |
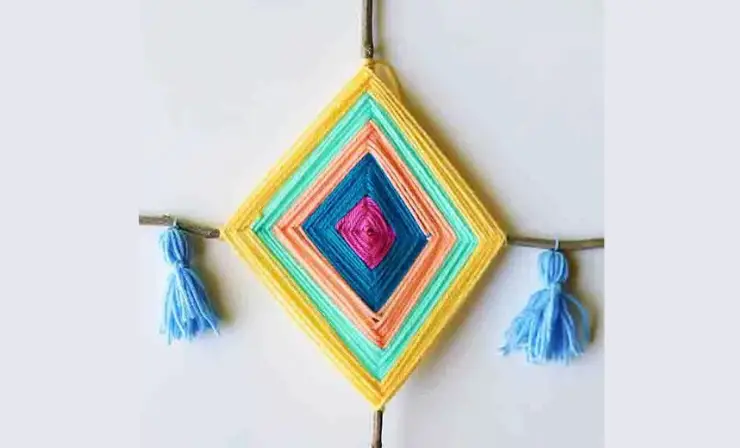
| 1. God’s Eye Yarn Art | Easy | Low ($1 to $5) | Immerse yourself in the rich cultural tradition of Mexican yarn art with this hands-on craft, where vibrant threads are intricately woven around sticks to create stunning geometric patterns, fostering creativity and cultural appreciation. |
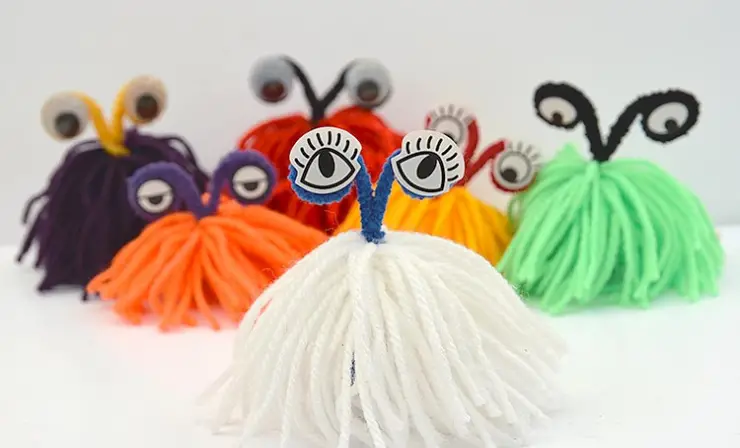
| 2. Yarn Monsters | Easy | Low ($1 to $5) | Ignite imagination and creativity as kids craft their own unique monsters using a variety of colored threads, googly eyes, and felt, encouraging storytelling and imaginative play. |
| 3. Yarn Sticks | Easy | Low ($1 to $5) | Transform ordinary sticks into vibrant works of art by wrapping them with colorful threads, providing a fun and tactile way for preschoolers to explore textures and colors in nature. |
| 4. Toilet Roll Bracelets | Easy | Low ($1 to $5) | Upcycle toilet paper rolls into fashionable bracelets by adorning them with colorful threads and beads, promoting sustainability and creativity in crafting. |
| 5. Wrapped Paper Tube Owls | Easy | Low ($1 to $5) | Combine crafting and recycling by transforming paper tubes into adorable owl decorations with colorful wrappings, fostering eco-consciousness and creativity. |
| 6. Pom-Pom Spiders | Easy | Low ($1 to $5) | Get into the Halloween spirit with these cute and creepy pom-pom spiders made from colored threads and pipe cleaners, encouraging imaginative play and fine motor skills development. |
| 7. Fluffy Rock Pets | Easy | Low ($1 to $5) | Give pet rocks a fun and fuzzy makeover by adding thread hair, fostering creativity and imaginative storytelling through personalized rock pets. |
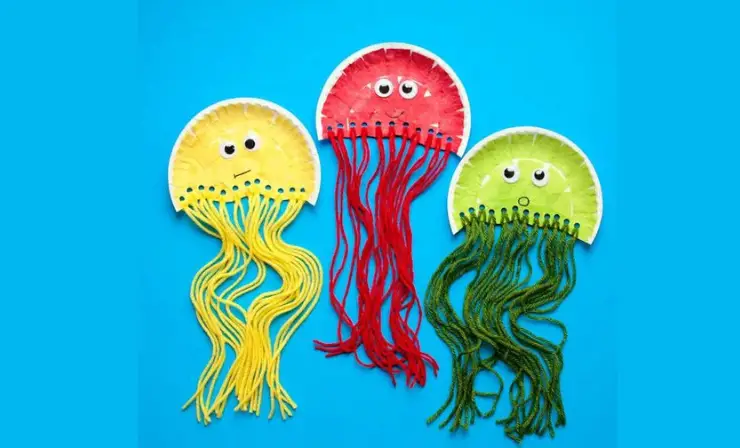
| 8. Paper Plate Jellyfish | Easy | Low ($1 to $5) | Dive into an underwater adventure by crafting colorful jellyfish using paper plates, threaded tentacles, and googly eyes, encouraging imaginative play and ocean exploration. |
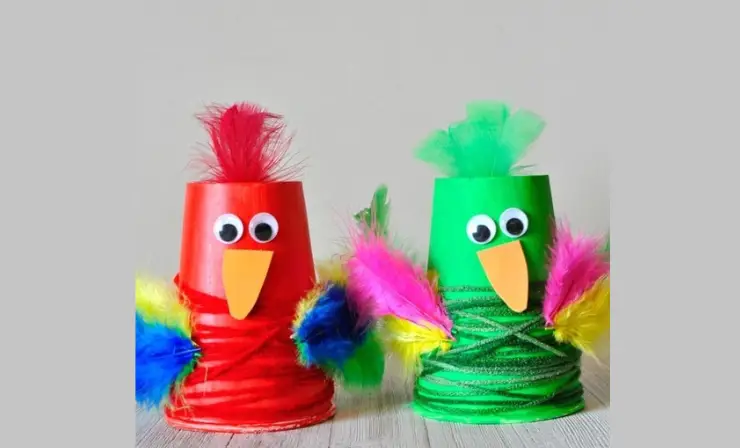
| 9. Paper Cup Parrot | Easy | Low ($1 to $5) | Soar into the world of tropical birds with this colorful paper cup parrot craft, made with threads, feathers, and paper, inspiring creativity and appreciation for wildlife. |
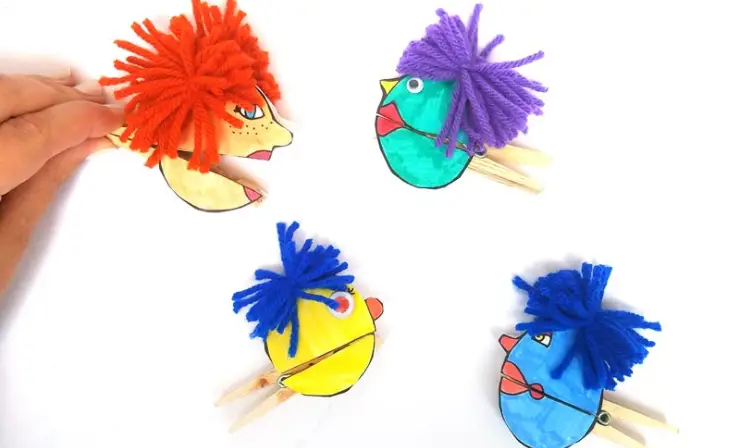
| 10. Clothes Pin Puppets | Easy | Low ($1 to $5) | Bring storytelling to life with these charming clothespin puppets featuring yarn hair and clothes, fostering imaginative play and storytelling skills. |
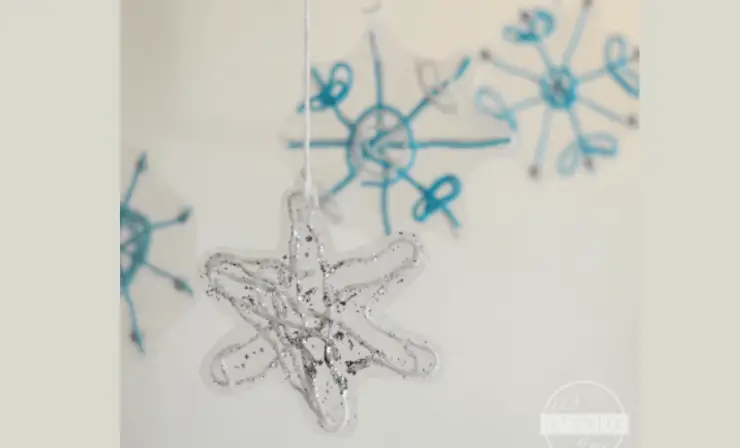
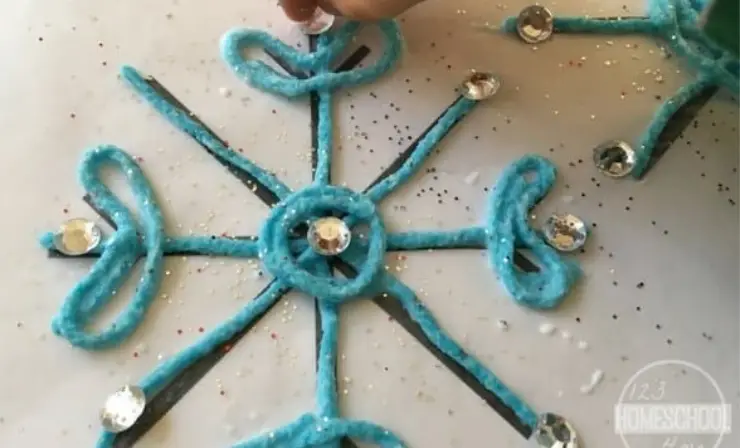
| 11. Sticky Snowflake | Easy | Low ($1 to $5) | Create delicate snowflakes using colored threads and sticky contact paper, offering a mess-free and sensory-rich crafting experience perfect for winter-themed activities. |
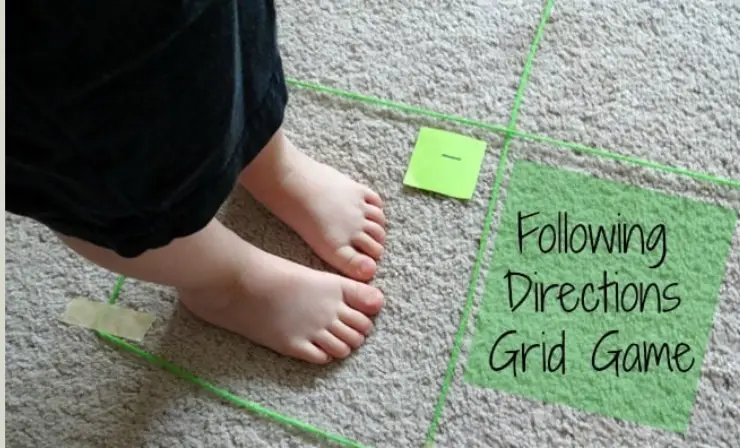
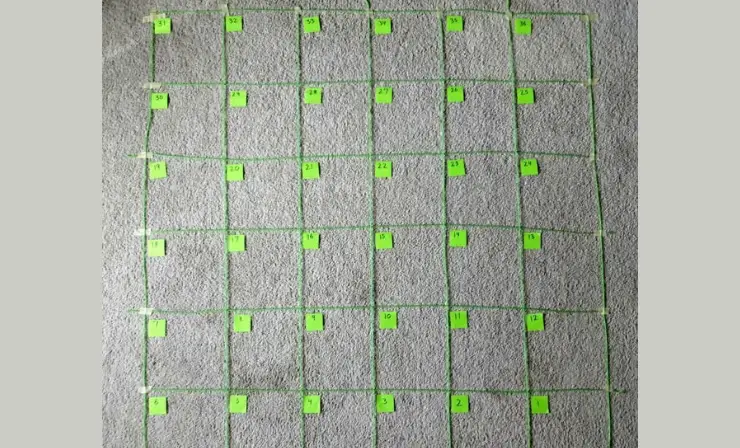
| 12. Map Game | Easy | Low ($1 to $5) | Foster spatial awareness and directional skills with this interactive grid game where kids navigate through a floor grid using colored pathways, combining movement with learning about directions and counting. |
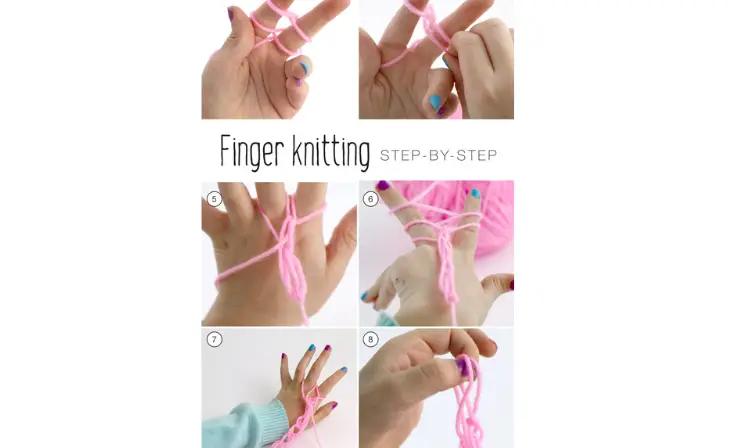
| 13. Finger Knitting | Easy | Low ($1 to $5) | Introduce kids to the art of finger knitting, a tactile and calming activity using colored threads to create “rope” designs, promoting hand-eye coordination and fine motor skills development. |
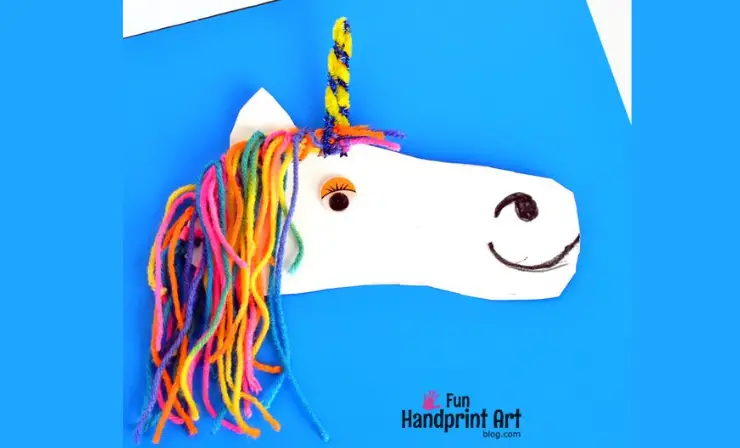
| 14. Unicorn Craft | Easy | Low ($1 to $5) | Spark imagination and creativity with this enchanting unicorn craft made from cardstock, colorful threads, and googly eyes, offering opportunities to practice fine motor skills and hand-eye coordination while creating a magical creature. |
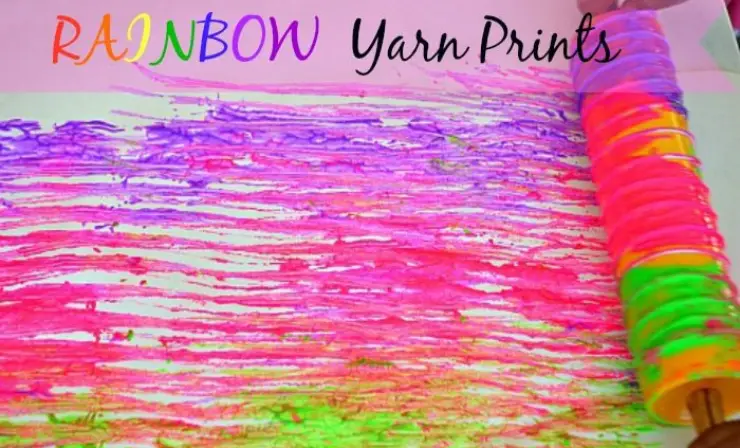
| 15. Rolling Pin Yarn Art | Easy | Low ($1 to $5) | Explore texture and color with this sensory-rich art activity using rolling pins, colored threads, and neon paints to create vibrant and dynamic prints, fostering creativity and experimentation. |
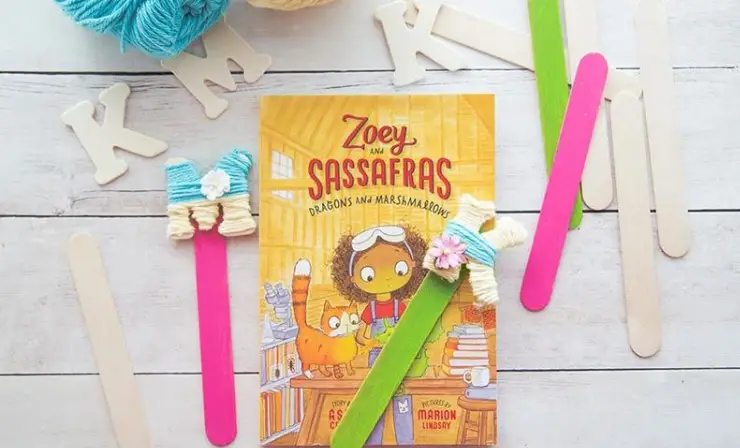
| 16. Letter Craft | Easy | Low ($1 to $5) | Personalize bookmarks with this letter craft using wooden letters wrapped in colorful threads, encouraging letter recognition and fine motor skills development while creating functional and decorative bookmarks. |
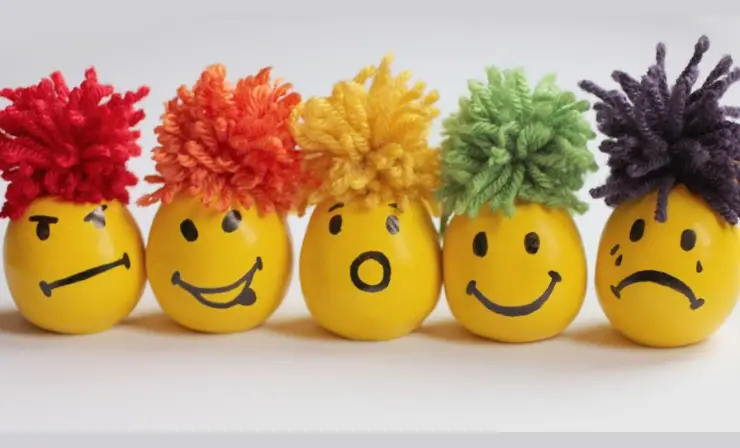
| 17. Crazy-Hair Stress Balloons | Easy | Low ($1 to $5) | Transform ordinary balloons into quirky stress balls adorned with expressive faces and colorful hair, providing a fun and tactile outlet for emotional expression and stress relief. |
| 18. Soda Straw Weaving | Easy | Low ($1 to $5) | Engage in sustainable crafting by repurposing plastic drinking straws into woven bracelets using colorful threads, promoting eco-consciousness and creativity while making personalized accessories. |
| 19. Create Cute Yarn Turtles | Easy | Low ($1 to $5) | Craft charming turtles using popsicle sticks wrapped in colorful threads, encouraging creativity and fine motor skills development as kids weave patterns to form adorable turtle designs. |
| 20. Yarn Wrapped Planets | Easy | Low ($1 to $5) | Embark on an imaginative journey to outer space by creating planets from cardboard wrapped in colorful threads, promoting creativity and fine motor skills while learning about the solar system. |
| 21. Go Star-Gazing with Constellation Sewing Cards | Easy | Low ($1 to $5) | Explore the night sky and learn about constellations with sewing cards featuring star patterns, fostering fine motor skills and spatial awareness through hands-on learning. |
| 22. Paint Without Paint | Easy | Low ($1 to $5) | Discover a unique painting technique using colored thread and adhesive paper, encouraging creativity and sensory exploration without the mess of traditional painting. |
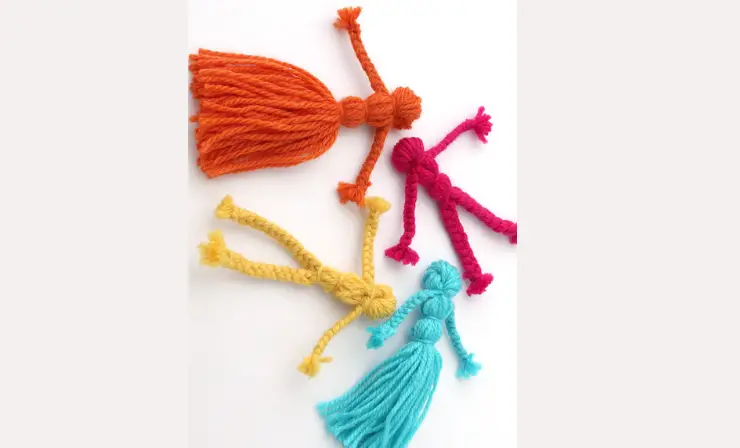
| 23. Play with Dolls | Easy | Low ($1 to $5) | Dive into the world of dolls by crafting whimsical figures using colored threads and cardboard, promoting creativity and fine motor skills as kids bring their imaginative characters to life. |
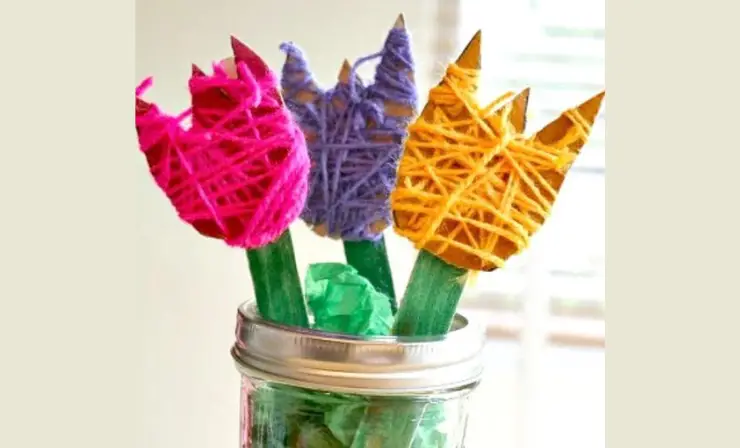
| 24. Wrapped Tulips | Moderate | Low ($1 to $5) | Explore the beauty of spring with these vibrant yarn-wrapped tulip flowers, encouraging fine motor skills and creativity while learning about nature and seasons. |
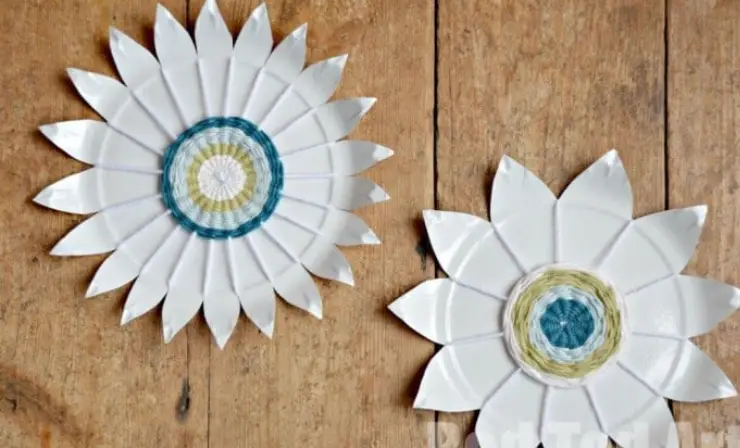
| 25. Paper Plate Weaving | Moderate | Low ($1 to $5) | Introduce kids to the art of weaving with this simple yet engaging activity using paper plates and yarn, promoting hand-eye coordination and creativity. |
| 26. Chick Nests | Moderate | Low ($1 to $5) | Craft adorable chick nests using thread, plastic cups, and colorful eggs, fostering creativity and fine motor skills as kids create their own cozy homes for cute chicks. |
| 27. Dreamcatcher | Moderate | Middle ($5 to $10) | Delve into Native American folklore while creating beautiful dreamcatchers using thread, feathers, and beads, offering a soothing and creative activity that also encourages mindfulness and relaxation. |
| 28. Festive Yarn Balls | Moderate | Middle ($5 to $10) | Add a touch of whimsy to any celebration by crafting festive balls with balloons, colorful threads, and glue, providing a fun and messy sensory experience for preschoolers. |
Here’s a simplified and adapted guide to some fun and easy yarn crafts that are perfect for preschool kids. Each craft is designed to be both enjoyable and educational, helping to develop various skills while having a blast!
1. God’s Eye Yarn Art
Join us in making God’s Eye Art, where you’ll learn the basics of weaving using just sticks and thread. This activity involves crossing sticks and wrapping them with colorful material to create eye-catching patterns. It’s a great way to enjoy art without any mess, and it can be done with simple materials you might already have at home. Perfect for a rainy day or any day you feel creative!
Difficulty Level: Easy
Cost: Low ($1 to $5)
Materials
- Threads of different colors
- Two wooden sticks (like popsicle sticks or dowel rods)
- Rubber band (optional)
I recommend watching the video “Learn how to make the classic camp craft, the gods’ eye!” to discover how to use sticks and yarn to create this fun and engaging DIY craft for kids.
Steps
- Cross the two sticks in the middle and tie them together with a rubber band.
- Start by holding the end of the thread against the sticks and wrap it around one stick. Move to the next stick and wrap again. Keep going!
- To change colors, just cut the thread, tie on a new color, and keep wrapping.
- When you’re done, tie the thread end to a stick and tuck any loose ends behind.
What It Teaches
God’s Eye Art is excellent for developing fine motor skills as children manipulate threads and sticks with precision. The activity also enhances spatial awareness and pattern recognition, as kids decide how to wrap the material to create symmetrical designs. Additionally, it fosters creativity and artistic expression while providing a sensory experience with the varied textures of thread and wood. It’s a wonderful way to introduce young children to the concept of weaving.
2. Yarn Monsters
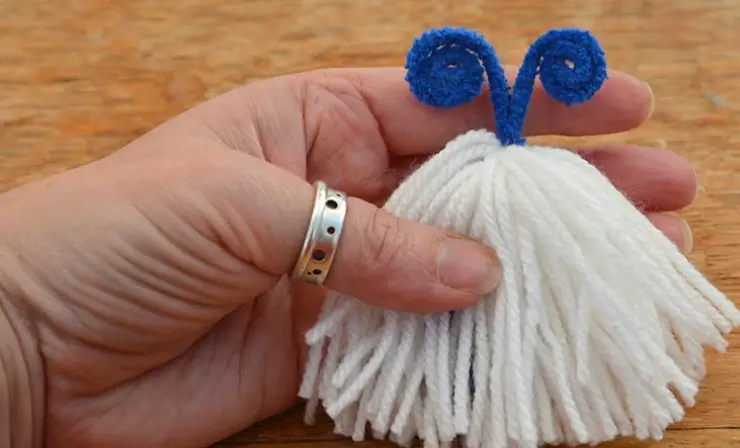
Craft your very own Monster buddies in this fun and fluffy project! Using simple materials like thread and pipe cleaners, you can design and craft unique little creatures with big personalities. This activity allows children to express their creativity freely as they choose colors and shapes for their monsters. It’s an engaging craft that results in adorable, playful creatures that kids will love to make and play with.
Difficulty Level: Easy
Cost: Low ($1 to $5)
Materials
- Yarn (various colors)
- Pipe cleaners
- Googly eyes or eye stickers
- Scissors
- PVA glue (white glue)
Steps
- Fold a pipe cleaner in half and twist to create a small loop.
- Wrap the material around your fingers until it’s nice and thick.
- Slide the looped pipe cleaner through the wrapped material, twist to secure, and snip the loops to create fuzzy ends.
- Arrange the material to cover the pipe cleaner base, trim any uneven parts, and create feet.
- Twist the remaining pipe cleaner ends into circles for eyes, add googly eyes, and let the monster-making fun begin!
What It Teaches
Making Yarn Monsters helps children explore their creative potential, encouraging them to imagine and bring to life their own monster designs. This craft improves manual dexterity and hand-eye coordination as kids twist, wrap, and cut materials. It also stimulates problem-solving skills when deciding how to construct the monsters and attach features. Emotional development is supported too, as kids bond with their creations and engage in imaginative play.
3. Yarn Sticks
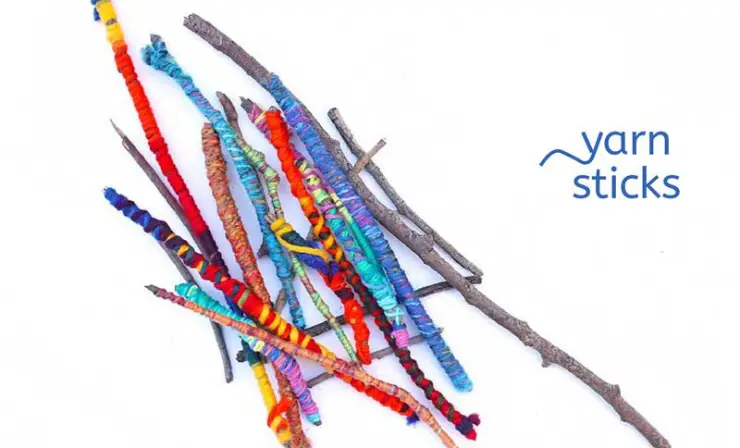
Embrace nature and creativity with Wrapped Sticks! This craft starts with an adventure outdoors to collect sticks, followed by a cozy crafting session indoors where you wrap your finds in colorful material. Not only is it a delightful way to decorate sticks, but it also turns them into art pieces or play items. It’s a simple yet engaging activity that combines outdoor exploration with creative expression.
Difficulty Level: Easy
Cost: Low ($1 to $5)
Materials
- Sticks of different sizes
- Variegated or ombre yarn
- Scissors
- Glue (optional)
Don’t miss the video “Yarn Sticks: Watch to Learn How to Create” to discover a simple and artistic way to make colorful, decorative wrapped sticks!
Steps
- Tie thread around one end of a stick and start wrapping tightly.
- Keep wrapping until the stick is fully covered or as much as you like.
- Optionally secure the end with a bit of glue for extra hold.
What It Teaches
Wrapped Sticks teach kids about colors and patterns while honing their fine motor skills through the act of wrapping thread tightly around sticks. This activity encourages an appreciation for nature and the outdoors, as kids learn to see potential in everyday objects. Additionally, it promotes planning and sequencing skills as they decide the order of colors and how to wrap the material to achieve the desired aesthetic effect.
4. Toilet Roll Bracelets
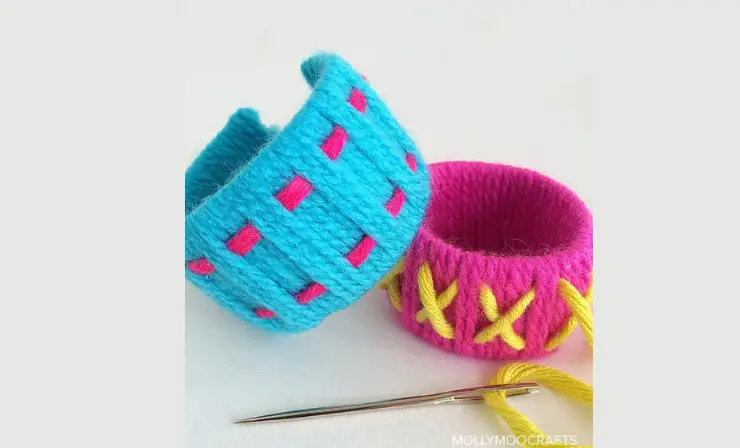
Transform ordinary toilet rolls into vibrant bracelets with this simple yarn-wrapping craft. This project encourages children to reuse materials creatively, turning what would be waste into wearable art. It’s a fantastic way for kids to practice their crafting skills, experiment with color combinations, and develop a sense of style and design by creating something they can actually wear.
Difficulty Level: Easy
Cost: Low ($1 to $5)
Materials
- Yarn
- Recycled toilet rolls
- Scissors
Steps
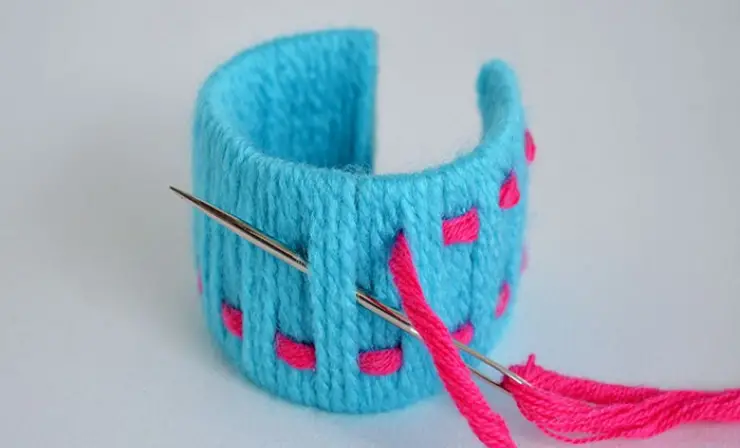
- Cut the toilet rolls into smaller rings.
- Choose your favorite yarn colors and start wrapping them around the roll pieces.
- Continue wrapping until the entire roll is covered in a beautiful pattern.
What It Teaches
Toilet Roll Bracelets teach children about recycling and sustainability by repurposing household waste into new, useful items. The craft develops fine motor skills as children handle small thread pieces and focus on neatly wrapping the material around the rolls. It also boosts decision-making and artistic skills as kids choose colors and patterns, fostering a sense of accomplishment when they wear their handmade jewelry.
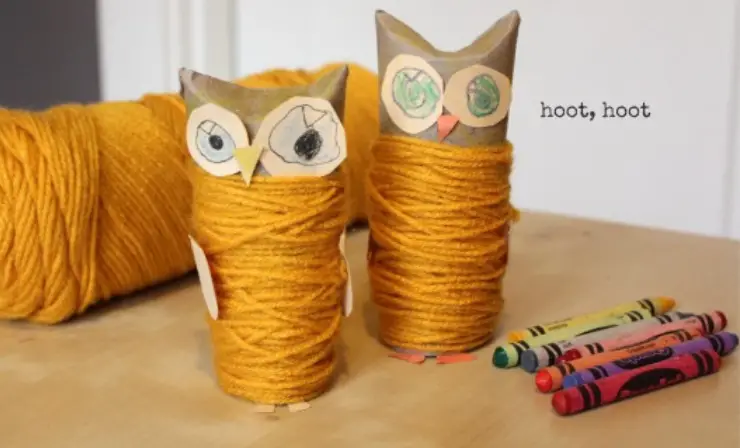
5. Wrapped Paper Tube Owls
Turn a simple paper tube into a cute owl with just some yarn and creativity! This craft involves folding and wrapping techniques that transform everyday materials into adorable little owls with big eyes and colorful feathers. It’s a fun way to recycle and make a new friend. Children will enjoy making their own owls, choosing colors, and adding features like eyes and wings.
Difficulty Level: Easy
Cost: Low ($1 to $5)
Materials
- Paper tube
- Yarn (any color)
- Glue dots or tape
- Crayons
- Scissors
- Paper scraps for eyes, wings, and beak
Check out the video “Make a Few Fun Paper Tube Yarn Owls for Craft Time with the Kids!”—it’s perfect for spring or celebrating Earth Day with a fun, recycled craft.
Steps
- Fold down the top edges of the paper tube to form the owl’s ears and secure it with glue.
- Start wrapping the thread around the lower three-quarters of the tube for the body.
- Cut and tie off the thread when finished wrapping.
- Cut out shapes for the eyes, wings, feet, and beak from paper scraps, color them, and attach them to the body.
What It Teaches
This craft helps preschoolers develop fine motor skills through cutting, folding, and wrapping. It also encourages creativity as children decide on the design and colors of their owls. The activity enhances understanding of symmetry when placing facial features and wings, and teaches basic recycling concepts by reusing materials creatively.
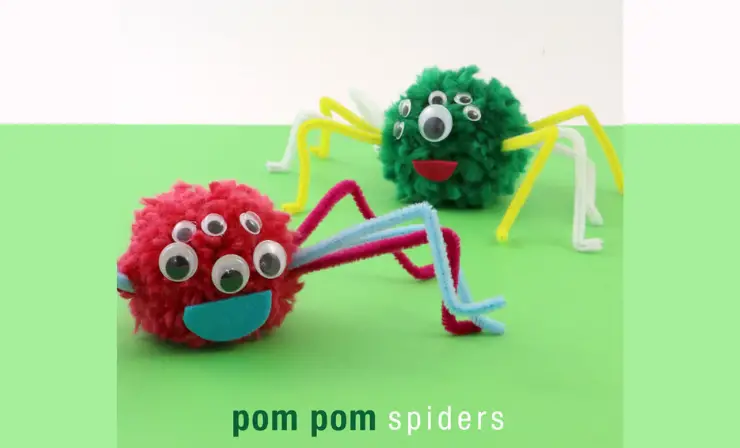
6. Pom-Pom Spiders
Make these adorable pom-pom spiders that are perfect for Halloween or any playful decoration. This craft uses yarn and pipe cleaners to create fluffy, friendly spiders with googly eyes. It’s a great activity for children to enjoy making something soft and cute that they can also play with or use to decorate their room.
Difficulty Level: Easy
Cost: Low ($1 to $5)
Materials
- Bulky yarn
- Four pipe cleaners per spider
- DIY cardboard pom-pom maker
- Googly eyes
- A small scrap of felt for the mouth
- Hot glue gun
Check out the video “How to Make a Pom Pom Maker Tutorial (Craft Basics – Pom Pom)” to learn how to easily create your own pom poms with a homemade maker.
Steps
- Place pipe cleaners on the pom-pom maker and wrap them with thread.
- Tie the thread tightly at the center and cut to form a pom-pom.
- Trim the pom-pom to even out the fluff.
- Bend the pipe cleaners into leg shapes and attach them.
- Glue on googly eyes and a felt mouth.
What It Teaches
Creating pom-pom spiders helps develop hand-eye coordination and fine motor skills as children wrap thread and cut it into pom-poms. It encourages creativity in decorating and assembling their spiders. Additionally, this craft can introduce discussions about insects, specifically arachnids, allowing children to learn the basic biological traits of spiders in a fun and engaging way.
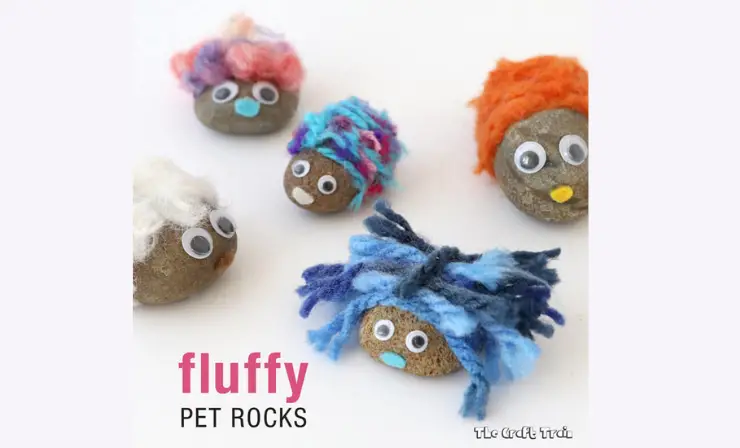
7. Fluffy Rock Pets
Create your very own fluffy rock pet using simple materials like rocks, yarn, and glue. This craft allows children to bring to life their imagination by making a rock ‘pet’ that they can decorate and personalize. It’s a wonderful way to combine nature and art, using tactile materials that encourage sensory exploration.
Difficulty Level: Easy
Cost: Low ($1 to $5)
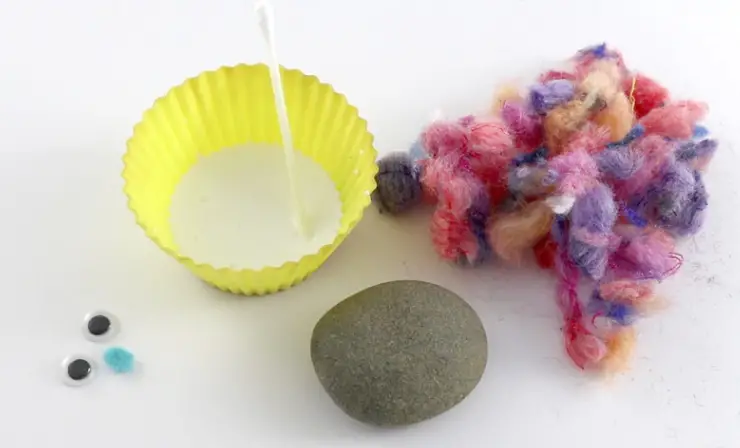
Materials
- Smooth round rocks
- Googly eyes or paper eyes
- Felt scraps
- Pom-pom trimmings
- Tacky craft glue
Steps
- Apply glue to the back two-thirds of a rock.
- Press fluffy bits of yarn onto the glued area.
- Attach googly eyes and a nose cut from felt.
- Enjoy your new rock pet!
What It Teaches
This craft enhances sensory skills by working with different textures like rocks, yarn, and felt. It boosts creativity as children choose how to decorate their pet rocks. The activity also helps develop fine motor skills through precise gluing and placement of small materials. It’s a playful way to teach about caring for pets and responsibility, even if the pet is just a rock!
8. Paper Plate Jellyfish
Create a charming jellyfish using a paper plate and yarn in this delightful craft that’s perfect for young kids. This activity is not only fun but also a great way to practice using scissors and glue. Kids will enjoy making their jellyfish sway with colorful tentacles and will learn about sea creatures in a creative setting.
Difficulty Level: Easy
Cost: Low ($1 to $5)
Materials
- Paper plate
- Tissue paper
- Yarn
- Googly eyes
- Scissors
- Glue
- Hole punch
- Black marker
I recommend watching the video where they show how to make an easy preschool craft, “The Jellyfish,” out of a paper plate— it’s very easy to make and perfect for young crafters!
Steps
- Cut tissue paper into small squares and glue them to the paper plate.
- Cut a wavy line at the bottom of the plate.
- Use a hole punch along the wavy line and thread yarn through the holes for tentacles.
- Attach googly eyes and draw a mouth with the marker.
What It Teaches
This activity aids preschoolers in refining fine motor skills by involving cutting, punching holes, and threading material. It fosters creativity and artistic expression in decorating the jellyfish. Moreover, it offers an opportunity to educate children about marine life, particularly the characteristics and habitat of jellyfish, nurturing an early interest in biology and the natural world.
9. Paper Cup Parrot
Let’s transform a simple paper cup into a colorful parrot! This craft involves painting, cutting, and gluing to bring a vibrant bird to life. It’s a fantastic activity for young artists to explore their creativity by mixing colors and adding different textures with yarn and feathers. Making this paper cup parrot offers a fun way to learn about birds while crafting.
Difficulty Level: Easy
Cost: Low ($1 to $5)
Materials
- Paper cup
- Acrylic paint
- Paintbrush
- Colored feathers
- Yarn
- Googly eyes
- Orange foam craft sheet
- Toothpick
- Glue gun
- Tape
Don’t miss the video “Amazing Paper Cup Art and Craft” to explore creative and inspiring ways to transform paper cups into stunning artworks!
Steps
- Paint the outside of the paper cup and let it dry.
- Tape one end of the yarn to the back of the cup and wrap it around the bottom half. Secure the end with tape.
- Use the glue gun to attach the cut-out foam beak and googly eyes to the cup.
- Glue feathers to the sides for wings and insert more feathers at the bottom for tail feathers using a toothpick.
What It Teaches
This craft enhances hand-eye coordination and fine motor skills through activities like painting, cutting, and precise gluing. It also encourages creativity in color and design choices, promoting artistic expression. By working on the parrot, kids learn about bird anatomy and the importance of texture and color in nature.
10. Clothes Pin Puppets
Create quirky and fun clothespin puppets using simple materials like yarn and markers. This craft allows children to design their own characters, which they can use in imaginative play or as decorations. It’s a great way to combine art and function, providing a playful exploration of crafting techniques.
Difficulty Level: Easy
Cost: Low ($1 to $5)
Materials
- Clothespins
- Card stock (for template)
- Markers
- Yarn
- Scissors
- Glue
- Optional: googly eyes
Check out the video “How to Make Puppets with Clothes Clips” and be sure to attach thread as hair to add a fun, creative touch to your handmade puppets!
Steps
- Color and cut out faces from the template.
- Cut the faces in half and create thread hair by wrapping it around your fingers, tying it off, and cutting the loops.
- Glue the hair and googly eyes to the face pieces.
- Attach the face pieces to the clothespins, ensuring they still open and close.
What It Teaches
This craft promotes creativity in designing characters and enhances fine motor skills through cutting, tying, and gluing. It also encourages narrative thinking and storytelling as kids use their puppets to create stories, fostering emotional expression and social interaction through play.
11. Sticky Snowflake
Make beautiful sticky snowflakes using a simple template and thread. This craft is perfect for exploring geometric shapes and symmetries, and it’s also a fun way to create seasonal decorations. Kids will enjoy the tactile experience of working with glue and thread to produce unique snowflake designs.
Difficulty Level: Easy
Cost: Low ($1 to $5)
Materials
- Yarn (white, silver, grey, blue)
- Snowflake template
- Cutting board or cookie sheet
- Wax paper
- Tape
- School glue (PVA glue)
- Optional: jewels, glitter, sequins
Steps
- Place the template under wax paper and secure it with tape.
- Cut thread into pieces according to the template.
- Dip yarn pieces in glue mixed with a little water and arrange them on the wax paper following the snowflake design.
- Optionally, add glitter or jewels for extra sparkle.
- Allow to dry completely before removing from the wax paper.
What It Teaches
This activity teaches kids about symmetry and pattern recognition as they arrange yarn to mirror snowflake designs. It enhances fine motor skills and precision by handling small pieces and placing them accurately. The craft also encourages creativity and experimentation with materials and decorations, fostering a sense of pride in creating something beautiful and unique.
12. Map Game
Embark on a fun-filled journey with our Map Game! This craft turns your floor into a navigational puzzle where children learn to follow directions to reach a destination. It’s a delightful way to integrate movement and education, teaching basic orientation and direction skills. As kids navigate the grid, they engage physically and mentally, making learning an exciting adventure.
Difficulty Level: Easy
Cost: Low ($1 to $5)
Materials
- Yarn or thick string
- Masking tape or painter’s tape
- Sticky notes
- Marker
Steps
- Use your feet to measure and tape a 6×6 grid on the floor.
- Place tape over the yarn at regular intervals to secure it.
- Create crisscrossing yarn lines using the tape as a guide.
What It Teaches
This game teaches spatial awareness, following instructions, and basic navigation skills. Children learn to interpret directions like left, right, forward, and backward, enhancing their understanding of spatial concepts. It also incorporates counting and simple geometry, making it a comprehensive educational activity that stimulates both the body and mind.
I suggest exploring the article “Critical Thinking Strategies for Elementary Students: 7 Exercises and 5 Activities to Help” to learn effective methods for improving critical thinking skills in young learners.
13. Finger Knitting
Discover the joy of finger knitting, a fun and easy way for kids to make their own knitted creations with just yarn and their fingers! This craft is perfect for making a variety of items like bracelets, scarves, or decorations. It’s a fantastic way to introduce young crafters to knitting, encouraging them to use their hands creatively.
Difficulty Level: Easy
Cost: Low ($1 to $5)
Materials
- Yarn (bulky kind recommended)
- Scissors
I recommend watching the video “Learn Finger Knitting” to master a simple and enjoyable way to knit without needles, perfect for both beginners and craft enthusiasts.
Steps
- Clamp the thread end between your thumb and palm.
- Weave the material into a figure eight around your two fingers.
- Lift the bottom loops over the top ones and off your fingers.
- Continue the process to extend the knit.
- To finish, cut the thread and secure the end through the loops. What It Teaches
Finger knitting improves fine motor skills and dexterity as children manipulate the yarn with precision. It teaches the basics of knitting patterns and can enhance concentration and patience. The activity also fosters a sense of achievement and creativity, as kids see a tangible result from their effort—skills useful in many areas of learning and personal development.
14. Unicorn Craft
Craft a magical unicorn from a shoe-shaped piece of cardstock! This creative activity not only captivates the imagination but also improves pre-writing and fine motor skills. As children punch holes and thread yarn for the unicorn’s mane, they develop hand strength and coordination, making this an educational and enchanting craft.
Difficulty Level: Easy
Cost: Low ($1 to $5)
Materials
- White cardstock
- Shoe for tracing
- Hole punch
- Scissors
- Yarn
- Googly eye
- Marker
- Pipe cleaners
Don’t miss the video “How to Make Unicorn String Art” for a step-by-step tutorial on creating a unique unicorn using string art technique—it’s a creative twist on crafting this mythical creature!
Steps
- Trace and cut a shoe shape from cardstock.
- Add a googly eye and draw facial features with markers.
- Punch holes along the top edge of the mane.
- Cut yarn strips, thread through holes, and tie knots.
- Create and attach a twisted pipe cleaner horn.
What It Teaches
This unicorn craft helps in developing fine motor skills through cutting, punching, and knot-tying. It encourages creativity and artistic expression while teaching about symmetry and the basics of textile manipulation. The craft also introduces children to basic sewing techniques, promoting skills that are foundational for more complex crafts.
15. Rolling Pin Yarn Art
Transform ordinary rolling pins into vibrant art tools with thread and paint! This engaging activity not only sparks creativity but also introduces young children to the concept of printmaking. As they roll painted thread-covered pins across the paper, they create colorful and unique patterns, making each artwork a surprise.
Difficulty Level: Easy
Cost: Low ($1 to $5)
Materials
- Rolling pins
- Yarn
- Hot glue or white glue
- Neon color paints
Check out the video “Rolling Yarn Prints” to dive into a fun, slightly messy activity that’s excellent for developing sensory and artistic skills!
Steps
- Securely wrap the thread around rolling pins using glue.
- Apply different colors of paint to the thread.
- Roll the pins over the paper to create artful prints.
What It Teaches
This craft activity teaches about color mixing and pattern creation, enhancing children’s understanding of visual arts. It also helps develop coordination and gross motor skills as they handle the rolling pins. Additionally, the tactile experience of manipulating different materials aids sensory development.
16. Letter Craft
Create personalized thread-wrapped letter bookmarks in this fun and educational craft. Using small wooden letters and colorful threads, children can design bookmarks that reflect their style while practicing their wrapping and gluing skills. This craft encourages reading and provides a practical application for their creations.
Difficulty Level: Easy
Cost: Low ($1 to $5)
Materials
- Yarn in various colors
- Small wooden letters (can be found at most craft stores or dollar stores)
- Clear tacky glue or hot glue (adult supervision is recommended for hot glue)
- Scissors
- Optional: Jumbo craft sticks for bookmark bases
- Optional: Embellishments like small paper flowers, glitter foam, or confetti glitter
I recommend watching the video “How To Make Yarn Letters” to learn a creative and engaging way to craft decorative alphabets that can personalize any space.
Steps
- Preparation: Select a wooden letter and thread color(s). If using a craft stick as a bookmark base, you might want to paint or color it first and let it dry.
- Start Wrapping: Apply a small amount of glue to one end of the wooden letter. Attach the end of the thread to this spot and start wrapping the thread tightly around the letter. For letters with separate sections (like ‘A’ or ‘B’), you might need to cut the thread and start new sections with fresh glue.
- Continue Wrapping: As you wrap, apply small dabs of glue periodically to keep the thread in place, especially around curves and edges. Change colors if desired by cutting the current thread and starting a new color with a dab of glue.
- Finishing Touches: Once the entire letter is covered to your satisfaction, cut the thread and secure the end with a final dab of glue. Add any embellishments like glitter, paper flowers, or additional thread details.
- Attach to Bookmark Base: If using a craft stick as a base, glue the finished thread-wrapped letter vertically to the top end of the stick, ensuring it’s centered and firmly attached.
What It Teaches
This craft enhances fine motor skills, planning, and spatial awareness as children wrap yarn around the letters. It encourages creativity and personal expression through color and decoration choices. By making something functional like a bookmark, children learn the value of creating useful items, promoting a love for reading and crafting simultaneously. Additionally, this activity improves problem-solving skills as kids navigate the unique shapes of different letters, deciding the best way to cover them uniformly.
17. Crazy-Hair Stress Balloons
Create fun and expressive stress balloons with crazy thread hair to explore emotions! Using simple materials like flour, balloons, and thread, this craft lets kids create squishy companions that can help them express and understand different feelings. The colorful thread hair adds a playful touch and helps children connect each balloon to a specific emotion, making emotional education engaging and hands-on.
Difficulty Level: Easy
Cost: Low ($1 to $5)
Materials
- Yellow balloons (or any light color)
- Flour
- Funnel or cut water bottle
- Black Sharpie
- Colored yarn
- Scissors
- Tape or rubber bands
Check out the video “DIY Balloon Squishy: Slow Rising Squishy with Balloons” for a fun and easy guide on making no-foam, stress-relieving squishy balls that are as enjoyable to create as they are to play with!
Steps
- Stretch the balloon over the funnel or cut the water bottle.
- Fill the balloon with flour, tapping the funnel to move the flour into the balloon.
- Once filled, carefully remove the balloon from the funnel and tie it off securely.
- Draw different facial expressions on each balloon using the Sharpie.
- Create yarn pom-poms for hair and attach them to the top of each balloon using tape or rubber bands.
What It Teaches
This activity is great for teaching emotional intelligence and self-expression. As kids craft different faces on the balloons, they learn to identify and label emotions. The tactile nature of the stress balloons allows children to physically engage with the concept of feelings, which can enhance their empathy and understanding of their own emotions. Handling and squeezing the balloons can also provide a soothing sensory experience, helping to manage stress.
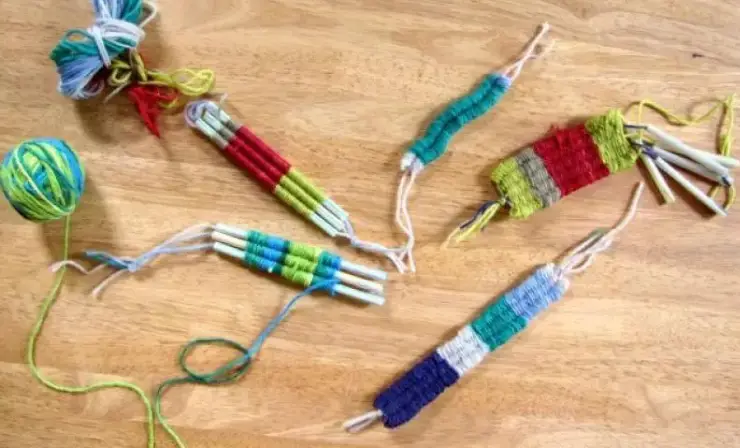
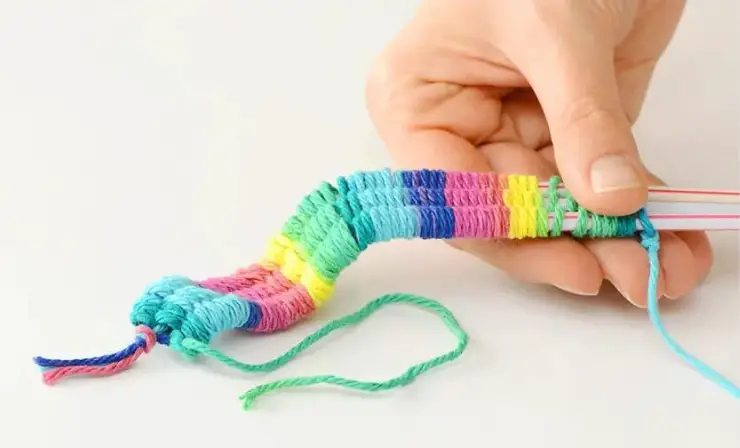
18. Soda Straw Weaving
Weave a friendship bracelet using yarn and soda straws, turning simple household items into beautiful jewelry. This craft is an excellent way for kids to learn basic weaving techniques and create something wearable that they can be proud of. It’s a fun, creative, and sustainable way to make unique accessories.
Difficulty Level: Easy
Cost: Low ($1 to $5)
Materials
- Yarn (various colors)
- 3-5 plastic drinking straws
- Tape (clear)
- Small piece of cardboard (like from a cereal box)
- Scissors
- Lighter (optional, for sealing yarn ends)
Steps
- Cut the straws into equal lengths, about 5-6 inches each.
- Tape the straws together side by side to form a base for weaving.
- Tie one end of the yarn to the first straw and start weaving across the straws.
- Wrap the yarn around each straw, pulling tight to create a woven look.
- Continue weaving until the bracelet reaches the desired length.
- Tie off the yarn at the end, and remove the bracelet from the straws.
What It Teaches
Soda straw weaving teaches kids the fundamental skills of weaving, enhancing their coordination and dexterity. The repetitive motion of wrapping yarn helps develop fine motor skills while the planning involved in choosing colors and patterns boosts creativity and decision-making abilities. This craft also introduces children to sustainable practices by repurposing everyday items into new, functional pieces, fostering an appreciation for resourcefulness and environmental consciousness.
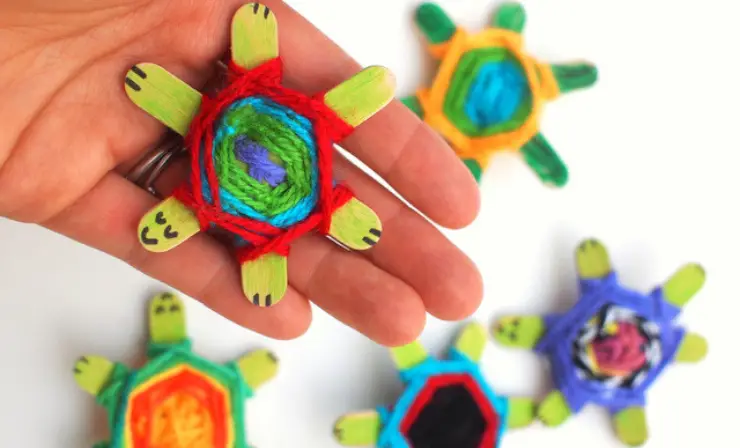
19. Create Cute Yarn Turtles
Transform mini popsicle sticks and yarn into adorable woven turtles! This craft project allows children to paint, assemble, and weave, creating cute turtle decorations. It’s an engaging way to combine different crafting techniques and materials in one fun activity. Kids will love making their turtle’s shell colorful and unique.
Difficulty Level: Easy
Cost: Low ($1 to $5)
Materials
- Mini popsicle sticks
- Quick-dry solid tempera paint
- >Yarn (various colors)
- Hot glue gun
- Scissors
Check out the video where Brandi demonstrates how to make a cute sea turtle using yarn and popsicle sticks—a fun and creative craft for all ages!
Steps
- Paint three mini popsicle sticks for each turtle and let them dry.
- Draw faces and toes on the popsicle sticks.
- Use hot glue to assemble the sticks into a turtle shape.
- Tie a long piece of yarn to one stick to start the weaving.
- Wrap and weave the yarn across the center of the assembled sticks to create the turtle’s shell.
- Change colors by tying new yarn pieces as desired.
- Once the weaving is complete, tie off the yarn securely.
What It Teaches
This craft project helps develop fine motor skills as children manipulate small brushes to paint and use yarn for weaving. The activity encourages creativity and color recognition as kids decide how to paint and weave their turtles. Assembling the popsicle sticks into a turtle shape also enhances problem-solving skills and spatial awareness. This craft provides a tangible reward that boosts confidence and showcases the children’s ability to create something charming and artistic from simple materials.
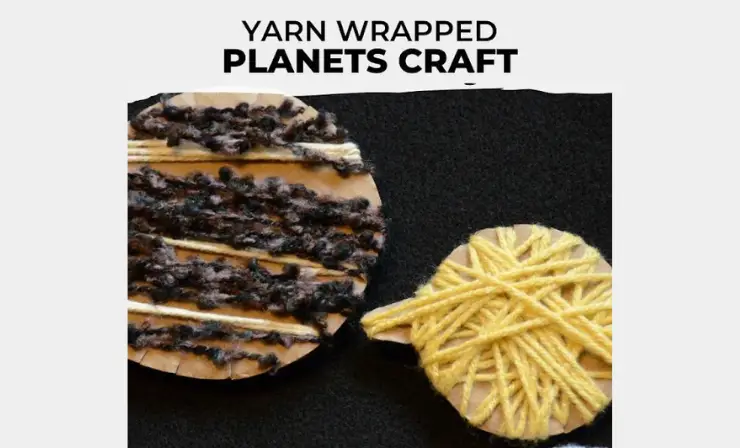
20. Yarn Wrapped Planets
Explore the solar system by creating yarn-wrapped planets! This educational craft allows children to learn about the planets while engaging in a tactile activity. Wrapping different sizes of cardboard cutouts with yarn can help visualize the variety in the solar system and offer a hands-on approach to learning about space.
Difficulty Level: Easy
Cost: Low ($1 to $5)
Materials
- Cardboard
- Yarn (different colors)
- Scissors
I recommend watching the video “Yarn Wrapped Planet Instructions” to learn how to create colorful, educational models of planets using yarn—a great project for both fun and learning.
Steps
- Cut the cardboard into circles of various sizes to represent different planets.
- Make small slits around the edge of each cardboard circle to hold the yarn in place.
- Begin wrapping yarn around each planet, securing it in the slits, and changing colors as needed.
- Continue wrapping until the entire surface is covered and the planet looks full and vibrant.
- Arrange the finished planets in order to teach about their positions in the solar system.
What It Teaches
This craft introduces basic astronomy concepts, helping children learn the names and order of the planets in our solar system. The activity promotes fine motor skills and hand-eye coordination as kids wrap yarn around the cardboard. It also encourages spatial thinking and planning as they figure out how to cover each planet completely with yarn. This visual and tactile experience helps solidify their understanding of the planets and their relative sizes, making learning about space fun and interactive.
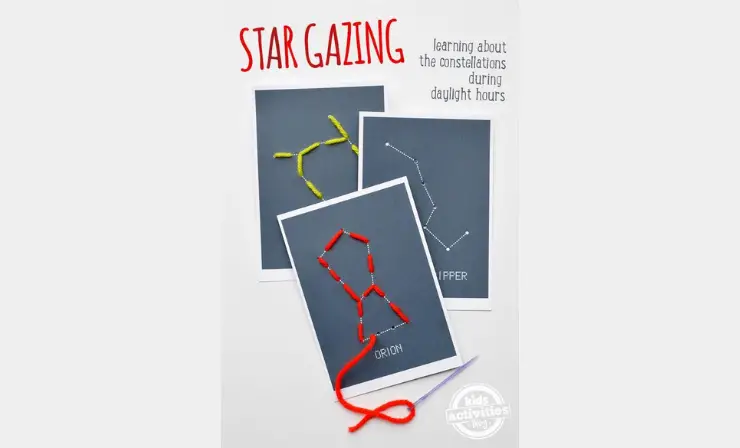
21. Go Star-Gazing with Constellation Sewing Cards
Explore the night sky by creating constellation sewing cards! This hands-on craft helps kids learn about different constellations while practicing their sewing skills. It’s a fantastic educational activity that combines crafting with basic astronomy, making it perfect for home or classroom learning.
Difficulty Level: Easy
Cost: Low ($1 to $5)
Materials
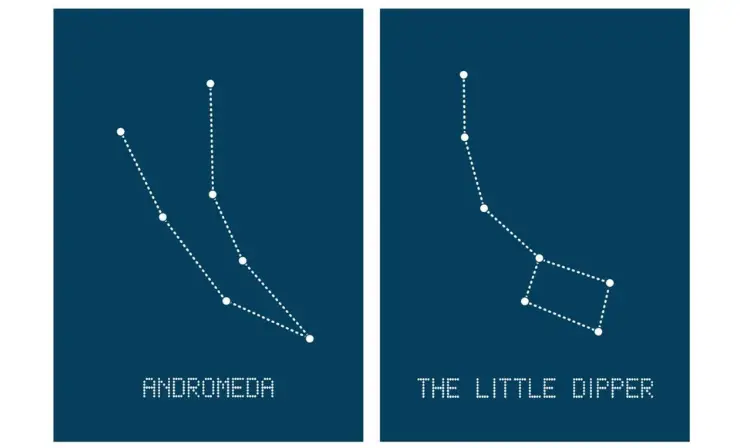
- Constellation printable (downloadable)
- Cardstock
- Paper punch
- Yarn or thread
- Kid-safe needle or a bent pipe cleaner (for younger kids)
Steps
- Print the constellation patterns on cardstock.
- Use a paper punch to make holes at each star point in the constellation.
- For younger children, prepare a “needle” by bending a small piece of pipe cleaner and threading wool through it.
- Thread the yarn or wool through the needle.
- “Sew” the yarn through the holes to outline the constellation.
What It Teaches
This activity teaches children about different stars and constellations, enhancing their understanding of the night sky. It also improves hand-eye coordination and fine motor skills through the sewing action. As kids navigate through the star paths, they engage in a tactile learning experience that helps cement their knowledge of astronomical patterns, promoting both cognitive development and spatial awareness.
22. Paint Without Paint
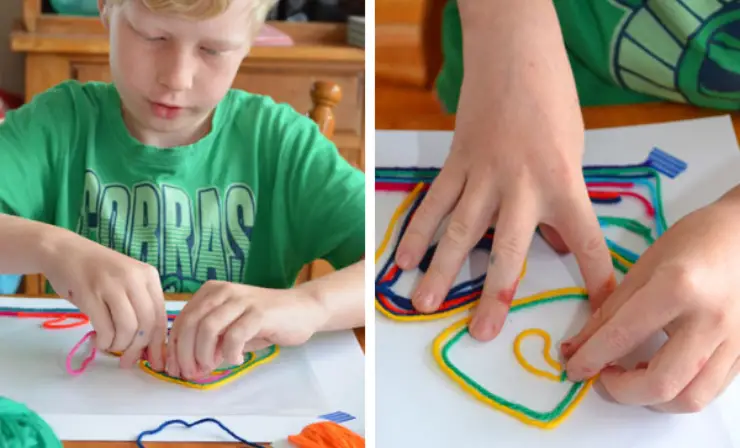
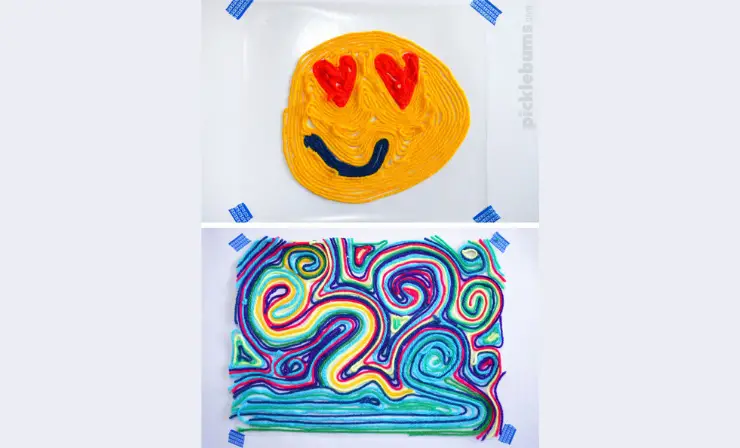
Imagine painting without any mess—this yarn painting activity makes it possible! By using colorful yarn and self-adhesive paper, children can create vibrant artwork without traditional paint. This innovative craft encourages creativity and allows for endless rearrangement, offering a unique way to explore artistic expression.
Difficulty Level: Easy
Cost: Low ($1 to $5)
Materials
- Clear self-adhesive book covering (contact paper)
- Colored yarn
- Scissors
- Tape
Steps
- Tape the self-adhesive paper, sticky side up, onto a surface or a piece of paper.
- Cut various lengths of colored yarn.
- Arrange the yarn pieces on the sticky paper to create designs or patterns.
- Adjust the placement of yarn as desired to perfect the artwork.
What It Teaches
This craft promotes creativity and imagination by allowing children to experiment with color and form in a non-traditional medium. It teaches flexibility and decision-making as they arrange and rearrange their designs. The tactile interaction with yarn enhances fine motor skills and sensory development. Plus, children learn about adhesion and material properties, exploring how different textures interact without the use of glue.
23. Play with Dolls
Create adorable yarn dolls using just yarn and a bit of cardboard! This fun and simple craft project is a great way for children to make their own toys and learn basic crafting techniques. It’s an engaging activity that encourages creativity and provides a delightful way to explore traditional doll-making.
Difficulty Level: Easy
Cost: Low ($1 to $5)
Materials
- Yarn (various colors)
- Cardboard scrap (a thick piece is ideal)
- Scissors
Steps
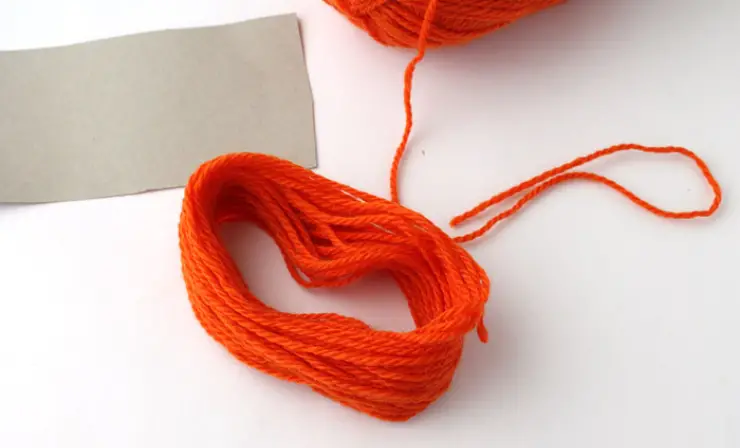
- Wrap yarn around a piece of cardboard to the desired thickness—this determines the doll’s body size.
- Carefully slide the yarn off the cardboard and tie one end to create the doll’s head.
- Separate the yarn into three parts: two for the arms and the central part for the body.
- Tie yarn around the middle to form the waist.
- Braid the arms and optionally the legs, or trim the bottom for a skirt look.
- Add features or accessories as desired.
What It Teaches
Making yarn dolls helps children develop fine motor skills and hand-eye coordination as they wrap, tie, and braid yarn. It fosters creativity in designing features and choosing colors for the dolls. This activity also introduces children to basic textile manipulation and doll-making, encouraging them to explore their imaginative abilities. Additionally, it can lead to an enhanced understanding of cultural and historical aspects of doll-making, connecting them to traditional crafts from around the world.
I recommend reading the article “21 Elementary School Talent Show Ideas to Unleash the Youth Potential” to discover inspiring and creative ways to showcase the talents of young students.
24. Wrapped Tulips
Create beautiful yarn-wrapped tulips with cardboard and some creativity! This craft is a delightful way to welcome spring and explore colors and textures. Wrapping the tulips with yarn is not only fun but also a great exercise for little hands, enhancing their ability to handle materials and follow a creative process.
Difficulty Level: Moderate
Cost: Low ($1 to $5)
Materials
- Yarn
- Cardboard
- Scissors
- Popsicle sticks
- Markers
I recommend watching the video “How to Make Tulips with Yarn and Cardboard!” to learn a creative and simple way to craft beautiful flowers that will brighten any space.
Steps
- Draw tulip shapes on cardboard and cut them out.
- Cut slits around the edges of the tulips to help with yarn wrapping.
- Start wrapping yarn around the tulips, securing the ends in the slits or with tape.
- Color in any visible cardboard with markers.
- Color popsicle sticks green, attach them as stems, and arrange your tulips in a jar.
What It Teaches
This craft project helps strengthen fine motor skills and dexterity as kids wrap yarn around the tulip cutouts. It also teaches color recognition and encourages creativity in decorating their flowers. The activity can foster an appreciation for nature and the changing seasons, linking craft to real-world experiences.
25. Paper Plate Weaving
Weaving with paper plates is a fantastic craft that introduces children to the basics of weaving using simple materials. This activity is perfect for teaching patience and concentration as kids weave yarn through cut slots in the plates, creating colorful and artistic designs that they can be proud of.
Difficulty Level: Moderate
Cost: Low ($1 to $5)
Materials
- Paper plates
- Yarn
- Cookie cutters (for shapes)
- Pencil
- Scissors
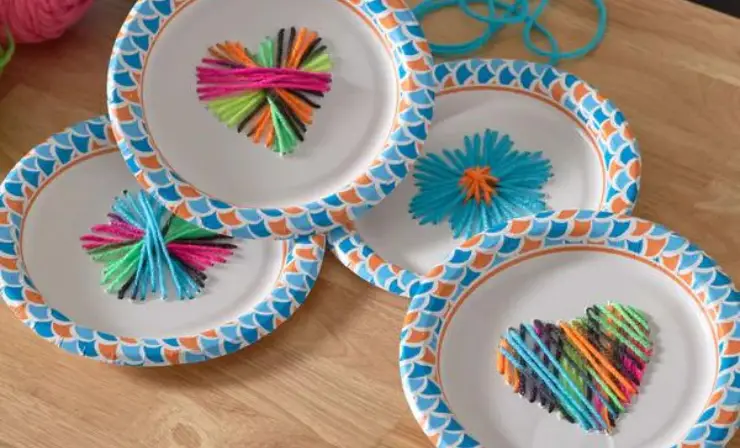
Steps
- Prepare paper plates by marking and cutting an uneven number of slots around the edges to form “petals.”
- Begin weaving by threading yarn through the slots in a pattern, securing the thread at the start.
- Continue weaving, changing colors as desired, until the plate is filled.
- Secure the end of the yarn by tying it off at the center.
What It Teaches
Paper plate weaving teaches children about patterns and sequences as they weave the yarn through the slots. It enhances fine motor skills and hand-eye coordination, which is important for writing and other detailed activities. The craft also encourages creativity and provides a sense of achievement when the weaving completes a beautiful pattern.
26. Chick Nests
Craft colorful chicks tucked into cozy yarn nests! This project transforms simple materials like plastic cups and yarn into adorable chick habitats. It’s a delightful way to celebrate spring and introduce children to crafting with different textures and materials. Plus, the vibrant chicks nestled in soft yarn can brighten up any space.
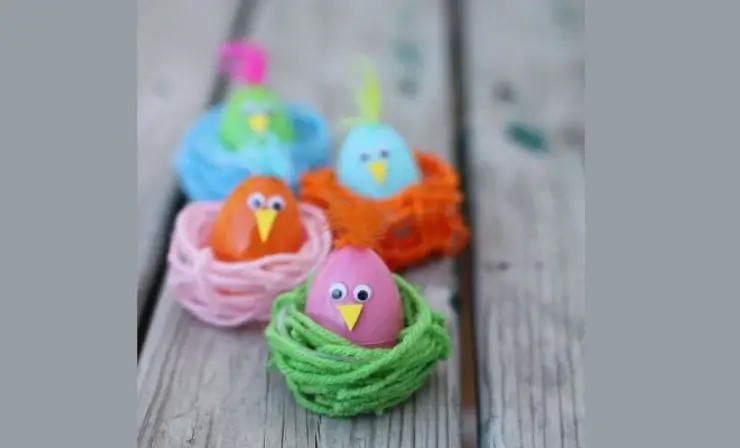
Difficulty Level: Moderate
Cost: Low ($1 to $5)
Materials
- Yarn (various shades of brown or colors of choice)
- Small plastic cups (like jello shot cups)
- Mod Podge
- Foam brush or paintbrush
- Plastic eggs
- Wiggle eyes
- Craft foam or felt
- Feathers
- Hot glue gun
I recommend watching this video to learn the simplest method for making bird’s nests using yarn, perfect for crafters of all skill levels.
Steps
- Protect your work area with wax or freezer paper.
- Cut 20 pieces of thread about 6 inches long.
- Apply a thick layer of Mod Podge outside and inside the plastic cup using a brush.
- Stick yarn pieces around the cup, letting the ends overlap for a textured look.
- Let the cup dry completely, then add extra yarn pieces if needed to fill gaps.
- Place a plastic egg inside the dry nest.
- Glue on wiggle eyes and craft foam or felt beak to the egg.
- Add a small feather on top for extra cuteness.
What It Teaches
This craft helps develop fine motor skills as children handle small materials like yarn, eggs, and eyes. Applying Mod Podge and arranging yarn trains their hand-eye coordination and spatial skills. Creatively, it encourages imagination as kids design their own little chick environments, enhancing their ability to follow instructions and use materials resourcefully. This project also introduces kids to the basics of sculptural art, showing how three-dimensional objects are crafted and assembled.
27. Dreamcatcher
Craft a dreamcatcher to capture dreams and decorate your room! Using materials like yarn, twine, and beads, you’ll wrap, weave, and decorate to create a beautiful and meaningful item. This craft not only allows for artistic expression but also introduces children to Native American cultural symbols, making it a learning experience that’s as enriching as it is enjoyable.
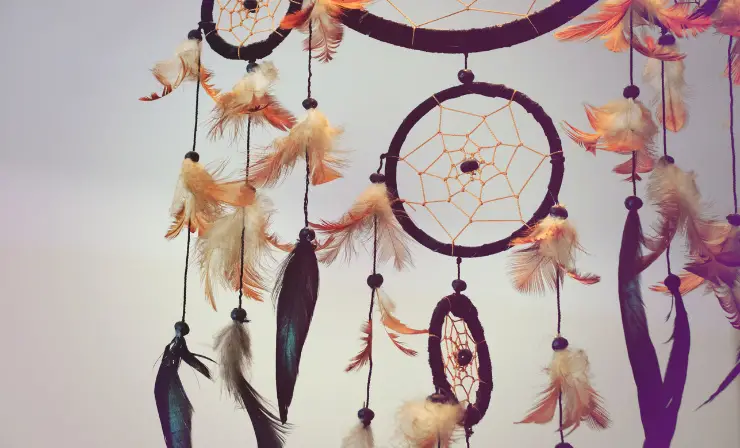
Difficulty Level: Moderate
Cost: Middle ($5 to $10)
Materials
- A ring (like a cardboard cutout, embroidery hoop, or metal ring)
- Baker’s twine
- Four colors of threads
- Thin twine
- Wooden beads
I recommend watching the video “Watch to Learn How to Make Dream Catcher” to master the art of creating this beautiful and meaningful craft.
Steps
- Wrap baker’s twine around the ring, leaving spaces for yarn.
- Fill the gaps with colorful yarn.
- Use thin twine to weave a web inside the ring, adding beads as you go.
- Create a fringe with the last color of yarn and add beads for decoration.
- Make a loop with twine and a bead to hang your dreamcatcher.
What It Teaches
Creating a dreamcatcher enhances fine motor skills through detailed crafting techniques like wrapping and weaving. This activity fosters creativity and artistic skills, encouraging children to make design choices about colors and bead placement. It also introduces cultural awareness by exploring the origins and meanings of dreamcatchers in Native American cultures, offering a holistic educational experience that combines art, history, and mythology.
28. Festive Yarn Balls
Create colorful and festive yarn balls with this exciting and somewhat experimental craft. By wrapping balloons with yarn soaked in a glue mixture, children can make decorations that can be hung around the home or used for play. It’s a fun way to explore shapes and textures, and the result is a delightful, touchable object that kids will be proud to display.
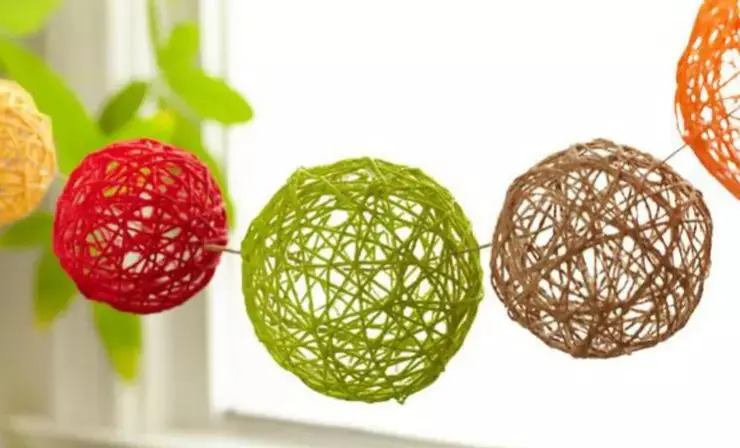
Difficulty Level: Moderate
Cost: Middle ($5 to $10)
Materials
- Balloons
- Plastic bags or a drop cloth
- Cooking spray
- White glue
- Cornstarch
- Hot water
- Scissors
- Yarn
- Mixing bowl
I recommend watching the video “How to Make Yarn Balls or Balloon Balls Very Easily in Two Different Methods” to learn simple and creative ways to craft these fun decorations.
Steps
- Inflate balloons to various sizes and prepare a drying area with a drop cloth.
- Spray balloons with cooking spray.
- Mix hot water, cornstarch, and glue in a bowl.
- Dip yarn into the glue mixture, squeeze out excess, and wrap around the balloons.
- Allow to dry completely, then pop the balloons and remove them.
What It Teaches
This project introduces basic chemistry concepts through the mixture of glue and cornstarch. It also develops fine motor skills and coordination as children wrap the balloons with yarn. The craft encourages patience and perseverance as they wait for the yarn balls to dry, and it teaches about 3D shapes and spatial awareness.
Useful Resources
- Fine Motor Activities For Preschool: Art Projects, Sensory Play, Crafts, And More
- Learn about shapes using paper plates and yarn
- Easily Teach Kids How to Knit
Final Thoughts
Exploring the world of yarn crafts is a fantastic way for preschool kids to develop crucial skills while having a lot of fun. These 28 easy crafts provide a variety of options that cater to different interests and skill levels, ensuring that every child can find something they enjoy.
Not only do these activities foster creativity and manual dexterity, but they also offer young learners a chance to express themselves and appreciate the value of handmade creations. Engage your little ones with these simple yet rewarding yarn crafts and watch them delight in the magic of creating something beautiful by themselves.
I recommend checking out the article “19 Engaging Electricity Science Experiments for Kids: Igniting Curiosity, Innovation, and a Love for STEM” for more exciting activities that encourage children to develop a passion for learning.
- Overview of 22 Low-Code Agencies for MVP, Web, or Mobile App Development - October 23, 2024
- Tips to Inspire Your Young Child to Pursue a Career in Nursing - July 24, 2024
- How Parents Can Advocate for Their Children’s Journey into Forensic Nursing - July 24, 2024
