
In today’s digital age, the realm of education is undergoing rapid transformations. Advanced digital tools and resources play a vital role in enriching the overall learning journey. SCORM (Sharable Content Object Reference Model) has emerged prominently amidst these resources as a crucial standard. This model empowers educators to design online courses that are not only interactive and trackable but also seamlessly compatible across various Learning Management Systems (LMSs).
To many school teachers, the technicalities of SCORM might appear daunting, almost like deciphering an intricate maze. Yet, the incorporation of SCORM has the potential to reshape the manner in which students interact with digital content. It paves the way for a well-organized, immersive, and accountable eLearning environment. If you are contemplating digitizing your current lesson structures or even designing an entirely fresh eLearning module, SCORM provides the adaptability and compatibility to ensure your content reaches a wide audience with ease.
To gain a deep insight into SCORM files, their operations, importance, and how they can be seamlessly woven into your training framework, our comprehensive SCORM guide is at your disposal. This article aims to simplify the complexities surrounding SCORM, presenting five effective strategies to develop SCORM-compliant courses. Our guide elucidates each step of the process, guaranteeing that even individuals with a limited tech-savvy background can venture into this digital educational realm with confidence. Gear up to redefine your pedagogical materials and amplify the learning experiences of your students.
In this article, we’ll explore:
- Understanding SCORM Files →
- 5 Ways to Create a SCORM File:
- Way #1: Creating a SCORM Course Using HTML →
- Way #2: Converting PowerPoint Presentations to SCORM →
- Way #3: Building a SCORM Course with Authoring Tools →
- Way #4: Leveraging Open-Source Tools for SCORM Creation →
- Way #5: Utilizing Third-Party SCORM Packagers →
- Playing a SCORM Course →
- Testing a SCORM Package →
- Editing a SCORM Package →
- 6 Tips for SCORM Course Creation →
- FAQ →
Understanding SCORM Files
A SCORM file is essentially a ZIP file containing markup files detailing the structure of a course, along with all necessary components. It should include:
- XML manifest file (imsmanifest.xml). This file provides all the vital data for a SCORM-compliant LMS to present the content: a unique identifier, metadata about the SCORM course, definitions of resources enumerating all files required for each resource’s launch and delivery, and the structure of learning tasks.
- Resource files constituting the course and its associated learning tasks.
- Schema/definition files (XSD and DTD) linked to the manifest file.
Way #1: Creating a SCORM Course Using HTML
Curious about crafting a SCORM package from the ground up, without relying on authoring tools? Here’s a step-by-step breakdown of the process:
1. Gather Course Content
Compile everything—texts, images, audios, videos—and store them in a designated folder. Visualize how you’d like these elements to synchronize. Sketch a storyboard or draft an outline using your preferred text editor.
2. Transform into an HTML Format
Since an LMS necessitates browser-compatible content, your course should be formatted into HTML pages akin to a website. Every media element should be integrated into these HTML pages to ensure seamless operation on the LMS. If tech isn’t your forte, this might be challenging. Alternatively, structure your course using Google Docs and opt for File → Download → Web Page to generate the HTML variant of the course. Once this web-compatible version is ready, you can address its SCORM compatibility.

3. Incorporate Essential SCORM Files
Here, you’ll produce text files describing your course in SCORM language and combine them with your previously created HTML content in a ZIP package. This ensures your LMS can interpret the course and accurately log user metrics. A suggested approach:
- Download the SCORM 2004 Basic Run-time Package from scorm.com.
- Examine the file hierarchy. Observe how the HTML content is organized in conjunction with the SCORM files that represent it.

- Integrate certain files (Adlcp_rootv1p2.xsd, Ims_xml.xsd, etc.) with your HTML course.

- Modify the imsmanifest.xml file to align with your content by adjusting the title and HTML resource links.

4. ZIP Everything Together
Consolidate your customized imsmanifest with your HTML and SCORM files into a ZIP archive. You can then upload this to your platform for testing.
Manually packaging a SCORM course is intricate and demands technical expertise. It’s a route best taken by those with solid technical acumen and ample patience.
Why I like this way:
- Absolute control over the final output.
- Potential savings by avoiding authoring tools.
Some drawbacks:
- Necessitates skills in HTML and XML.
- Consumes more time than using a specialized tool.
- More prone to errors.
Way #2: Converting PowerPoint Presentations to SCORM
Constructing a SCORM course by hand can be both entertaining, as it encourages exploratory learning, and enlightening by fostering new skill development. However, imagine having to develop multiple SCORM lessons brimming with audios and videos. Such an endeavor could span many months, demanding relentless coding and editing of SCORM files.
Thankfully, there exists a suite of software tools designed to alleviate the burden of coding and packaging, freeing you to focus solely on the art of instructional design. These saviors in software form are known as SCORM authoring tools. They adeptly morph your courses from mere visual content into SCORM-compliant packages ready for LMS upload.
You might wonder: “What content types are these tools adept at converting? How can I bring my eLearning vision to fruition?” One universally accessible solution is PowerPoint. With over a billion installations globally, this software is almost ubiquitous. PowerPoint’s capability to weave text, images, audio, and video into a slide sequence positions it as a versatile tool for crafting learning modules.

Fast course authoring toolkit
Create online courses and assessments in record time.
Tools such as iSpring Suite empower users to transform PowerPoint slideshows directly into SCORM packages. To achieve this:
1. Initiate Your Tool
Install the iSpring Suite authoring toolkit on a PC equipped with MS PowerPoint.
2. Access the iSpring Suite Tab
Launch your presentation in PowerPoint and navigate to the iSpring Suite tab, then click ‘Publish’.
3. Select Publishing Environment
Within the ‘Publish Presentation’ window, select the LMS tab.
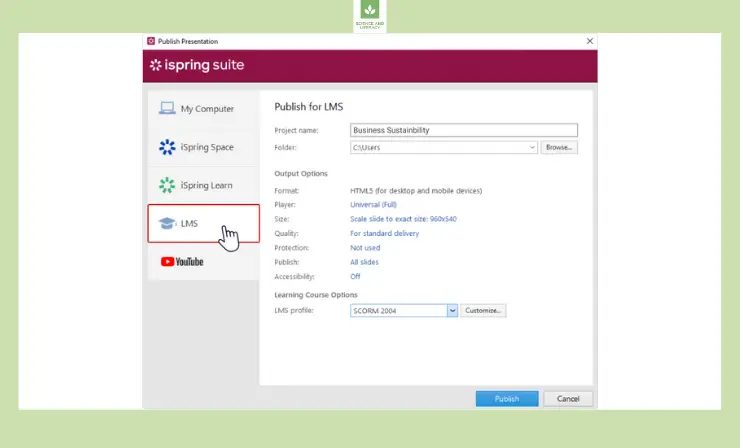
4. Determine Course Details
Designate your project name and choose a SCORM package save location. Default output options are available, but customization is also possible.
5. Choose the Right SCORM Version
In the LMS Profile section, opt for the SCORM version compatible with your LMS.

6. Optimize Learner Progress Parameters
Using the ‘Customize’ option, set parameters to assess learner progress, such as lesson duration, passing score, mandatory slide views, etc.
7. Compile and Export Your Course
Finally, click ‘Publish’, await the conversion, and your SCORM package will be ready.
Sophisticated authoring tools like iSpring Suite surpass mere conversion functionalities, enabling creators of all skill levels to design interactive content.
Why I like this way:
- Greatly reduces time spent on coding and packaging.
- Ensures LMS compatibility.
- Enhanced interactivity beyond mere textual and visual content.
Some drawbacks:
- Courses may feature SCORM point-rated activities for LMS-driven performance grading.
- Not a free tool.
You can also check out this video tutorial on converting PowerPoint presentations to SCORM courses using iSpring Suite:
Way #3: Building a SCORM Course with Authoring Tools
Crafting a SCORM course from the ground up might sound daunting, but with the help of an authoring tool, the task becomes straightforward and less time-consuming.
Among the plethora of authoring tools available, Adobe Captivate stands out as one of the most favored. It is renowned in the eLearning community for its versatility and comprehensive set of features, designed especially for instructional designers who aspire to transform traditional content into engaging eLearning modules. For an in-depth compilation of the best 21 authoring tools, we encourage you to consult our insightful article.
Embarking on the journey of SCORM course creation from scratch? Here’s a structured approach when using Adobe Captivate:
1. Set Up Your Workspace
Launch Adobe Captivate and select ‘Software Simulation’ or ‘Responsive Project’, based on your intended audience (mobile learners or desktop users).
2. Design and Develop Your Content
Utilize Captivate’s vast array of tools to integrate text, graphics, interactive elements, quizzes, videos, and more. The drag-and-drop functionality ensures even novices feel at home.
3. Ensure Interactivity
Take advantage of Captivate’s advanced actions and variables to create interactive and personalized learning experiences. Simulations and scenario-based training can be created with ease.
4. SCORM Compliance Settings
Navigate to ‘Publish Settings’ and select ‘Publish to SCORM’. This will enable features that make the course SCORM compliant and ready for LMS deployment.
5. Fine-Tune Reporting Options
In the same settings window, adjust how the course communicates with the LMS, defining success criteria, quiz scores, and interaction data.

6. Package Your Course
Once you’re satisfied with the design and functionality, click on ‘Publish’. Captivate will wrap everything into a SCORM-compliant ZIP package, primed for uploading to your desired LMS.

Adobe Captivate, while incredibly powerful, is also user-friendly, ensuring even those new to eLearning design can navigate its features with relative ease.
Why I like this way:
- Comprehensive toolset designed for eLearning professionals.
- Seamless integration of multimedia and interactive elements.
- Consistent output across multiple device types, enhancing learner experience.
Some drawbacks:
- Might come across as overwhelming to first-time users due to its multitude of features.
- Not a free software, but offers a trial version for users to experiment with before purchasing.
- Learning curve might be steeper compared to simpler tools.
You can explore official Adobe Captivate tutorials as well. Here’s one of them:
Way #4: Leveraging Open-Source Tools for SCORM Creation
With the assistance of an open-source authoring tool like Reload Editor, the process of creating a SCORM course becomes more navigable and efficient.
In the realm of SCORM authoring tools, Reload Editor emerges as a reliable open-source choice. Praised for its user-friendly interface and robust capabilities, it’s a boon for those seeking an economical approach to transform conventional learning materials into dynamic eLearning courses.
Ready to begin your SCORM course development journey with Reload Editor? Here’s a methodical guide to assist you:
1. Initialize Your Project
Open Reload Editor and choose ‘New SCORM Project’. Specify your target audience and desired course structure.

2. Integrate and Arrange Content
With the Reload Editor’s intuitive interface, seamlessly incorporate text, images, and other media. Its user-friendly design ensures that even beginners can effortlessly assemble content.
3. Enhance with Interactive Features
Utilize the tool’s features to embed quizzes, interactive diagrams, and other engaging elements to elevate the learner’s experience.
4. SCORM Compliance Configuration
Head to ‘Export Settings’ and opt for ‘SCORM Package’. This ensures your course adheres to SCORM standards, making it ready for integration with any LMS.
5. Adjust Reporting Preferences
Within the settings, customize how your course interacts with the LMS, setting benchmarks for successful course completion, interactive feedback, and quiz results.
6. Compile Your Cours
Once content and settings align with your vision, select ‘Export’. Reload Editor will then consolidate your course into a SCORM-compliant ZIP, prepared for LMS upload.
While Reload Editor offers a gamut of functionalities, its open-source nature ensures accessibility for all, including those venturing into eLearning design for the first time.
Why I like this way:
- Cost-effective solution for eLearning enthusiasts.
- A user-centric design promoting ease of use.
- Offers a wide range of interactive features to enhance courses.
Some drawbacks:
- Being open-source, it might lack some advanced features found in commercial tools.
- Initial setup and understanding of SCORM standards might be required.
- Community support, although beneficial, might not be as prompt as dedicated customer support from paid tools.
Way #5: Utilizing Third-Party SCORM Packagers
When exploring methods to craft SCORM courses, third-party packagers present a viable option. JCA Solutions Simple SCORM Packager (SSP) stands out in this category. Recognized for its direct methodology and effectiveness, it serves as the perfect instrument for educators and course designers aiming to transform classic learning materials into eLearning modules with minimal hassle.
Below is a structured guide to assist you in developing a SCORM course utilizing JCA Solutions Simple SCORM Packager (SSP):
1. Preparation
Organize your course files (e.g., HTML, images, audio) in a folder. Launch the Simple SCORM Packager (SSP).
2. Course Details and SCORM Settings
Input the course title, description, and select the SCORM version (1.2 or 2004). Configure any objectives, prerequisites, and assessment settings as needed.
 Define the course specifics and configure the SCORM settings
3. Import and Set Launch File
Click ‘Add Files’ to import your course files. Designate the primary learner start file (often “index.html”).
4. Metadata and Additional Configurations
Add relevant metadata, such as course language and duration. Adjust any other necessary configurations for sequencing and navigation.
5. Package and Test
Click ‘Finish’ to generate a SCORM-compliant ZIP. Test the package using a tool like SCORM Cloud or your LMS’s test environment.

6. Deploy
Upload the SCORM ZIP to your LMS and assign it to learners.
Simple SCORM Packager, with its specialized features, ensures that those diving into eLearning course creation find the process less daunting and more rewarding.
Why I like this way:
- Simplified SCORM packaging, reducing complexities.
- Enables efficient transformation of diverse content into SCORM compliant courses.
- Suitable for users with varying levels of technical expertise.
Some drawbacks:
- Being a specialized tool, it might not offer extensive course design capabilities as some full-fledged authoring tools.
- Depending on the version or provider, there might be a cost associated with acquiring the tool
- Might necessitate a preliminary understanding of SCORM standards for optimal utilization.
Playing a SCORM Course
You can directly access a SCORM course from your computer using a browser. Just unpack your ZIP file and initiate the launch file, typically named “index.html”.
If you’re utilizing an LMS, upload the SCORM package to it and initiate the course by clicking its icon.
Testing a SCORM Package
Directly uploading a SCORM package to your primary LMS might not always be the best strategy. Uploading sizable files like SCORM courses can be time-consuming, and the duration varies based on your LMS’s efficiency. If during a test, you spot an error (e.g., scores not reflecting after playing the role of a student), you’ll have to rectify it and re-upload, consuming even more time. Hence, seasoned instructional designers usually opt to trial their SCORM package before LMS integration or client presentation.
A top-tier method to evaluate a SCORM package is via the web-based service, SCORM Cloud by Rustici Software. Given that they’re the stewards of the SCORM standard, their platform is a trusted choice.
To test a SCORM package with SCORM Cloud, follow these steps:
- Sign up for a free trial.
- Add your SCORM package using the ‘Add Content’ button.

- Post-upload, click ‘Launch’ to initiate your course.
- Engage with the course as a student would, then shut the related browser tab.
- Observe if SCORM Cloud’s status transitions to ‘Complete’ or ‘Passed’, signaling the course’s functionality in a genuine LMS.

The simplicity of SCORM Cloud is transformative; once you integrate it into your instructional design workflow, there’s no looking back.
Editing a SCORM Package
A SCORM package is essentially web content designed to interface with an LMS via the SCORM API. It’s not feasible to modify or deconstruct a published course. Yet, the majority of SCORM courses originate from authoring tools, and they employ source (project) files housing all elements like text, images, videos, and so forth. Should you possess such a project file, it can be readily opened in the respective authoring tool. Here, you can implement desired modifications and subsequently publish the revised course as SCORM.
6 Tips for SCORM Course Creation
Creating SCORM courses can be a valuable skill for school teachers, especially in today’s digital learning environment. Here are some tips for teachers venturing into the creation of SCORM courses:
- Start Simple: If you’re new to SCORM, begin with basic courses. A simple PowerPoint presentation converted into SCORM using an authoring tool is a good start.
- Know Your Objectives: Define clear learning objectives before starting. Knowing what you want students to achieve helps guide the design and assessment components of the course.
- Choose the Right Tool: There are several SCORM authoring tools available, both free and paid. Consider tools that have intuitive interfaces, such as Articulate Storyline or Adobe Captivate. Some tools even offer special educational pricing.
- Use Interactive Elements and Multimedia Wisely: Engagement is crucial in eLearning. Incorporate quizzes, drag-and-drop activities, clickable elements, and other interactive components to keep students engaged. Mix text with images, audio, and video to cater to different learning styles. But avoid overwhelming students with too much multimedia or interactive elements — balance is key.
- Chunk the Content: Break the content into manageable chunks or modules. This modular approach makes it easier for students to digest information and also allows for flexible pacing.
- Continuous Improvement: After deploying the course, gather feedback from students. Use this feedback to make improvements in future courses or iterations. Also, consider taking short courses or workshops on eLearning design. This can enhance your skills and understanding of creating effective SCORM packages.
Remember, creating a SCORM course might seem challenging initially, but with practice and the right tools, it becomes more manageable. The effort is worth it, especially when you see enhanced engagement and learning outcomes in your students.
FAQ
Below, we’ve tackled some frequently asked questions about SCORM:
What is the origin and purpose of the SCORM standard?
SCORM was developed to standardize eLearning formats and ensure compatibility across various LMS platforms. It aimed to provide a consistent learning experience irrespective of the platform being used.
What's the future of SCORM with newer standards emerging?
While SCORM continues to be widely used, newer standards like xAPI offer more tracking capabilities and flexibility. The choice often depends on specific requirements and the technology adopted by the LMS or organization.
Can I convert other eLearning formats to SCORM?
Yes, many authoring tools allow for the conversion of different eLearning content formats into SCORM compliant packages.
How does SCORM differ from other eLearning standards?
While there are several eLearning standards like xAPI, AICC, and CMI5, SCORM is widely adopted due to its interoperability, allowing for easy content sharing and tracking across multiple LMSs.
Are translations and multi-language support possible in SCORM?
Absolutely. SCORM courses can be developed in multiple languages, providing a global reach. However, each language version might require a separate SCORM package.
Can SCORM courses be made accessible for learners with disabilities?
Yes, many authoring tools allow for the creation of SCORM content that adheres to accessibility standards, ensuring content can be accessed by learners with various disabilities.
Useful Resources
- SCORM Official Documentation by The Advanced Distributed Learning Initiative
- SCORM Cloud
- SCORM Technical Documentation by Rustici Software
Conclusion
The SCORM format is a real breakthrough in eLearning. It saves eLearners plenty of money by making SCORM content unified for all LMSs. Besides, it allows the tracking of learner progress and results, which makes online learning much more effective.
Fortunately, designing and publishing SCORM courses today is easier than ever. But, there are still opportunities for “handicrafters” looking for a technical challenge. We hope this article satisfies both camps and makes SCORM less of a scary acronym and more of a powerful eLearning tool.
Simona Johnes is the visionary being the creation of our project. Johnes spent much of her career in the classroom working with students. And, after many years in the classroom, Johnes became a principal.
Follow Simona: ![]()
![]()
![]()
![]()
- 5 Steps to Start Online Teaching - February 15, 2026
- Tips to Inspire Your Young Child to Pursue a Career in Nursing - July 24, 2024
- How Parents Can Advocate for Their Children’s Journey into Forensic Nursing - July 24, 2024