In the dynamic landscape of modern education, teachers are constantly on the lookout for effective methods to enhance their digital teaching resources. One such method that’s been gaining traction is the conversion of static PDFs into SCORM-compliant packages. While PDFs have long served as reliable document formats, their transformation into interactive SCORM modules can unlock a whole new dimension of e-learning possibilities.

SCORM, or Shareable Content Object Reference Model, provides an interactive and trackable framework for e-learning content, making it especially valuable in the educational sector. By converting PDFs into SCORM, educators can transcend traditional limitations of static content and foster a more engaging, immersive, and measurable learning experience for their students.
Yet, the conversion process might appear daunting, especially for those who are new to SCORM and its intricacies. To bridge this knowledge gap, this article delves into seven practical methods to transform your PDFs into SCORM courses. Moreover, to ensure the transition is smooth and the resulting content is of the highest quality, we’ll also offer seven indispensable tips tailored for educators.
Whether you’re a tech-savvy teacher or one just beginning to explore the digital realm, this guide aims to simplify the conversion process, empowering you to bring interactive, responsive, and trackable learning to your students.
What you’ll find on this page:
- What is SCORM? →
- The Benefits of Converting PDF to SCORM →
- 6 Ways to Convert PDF to SCORM:
- Way #1: iSpring Suite →
- Way #2: Adobe Captivate →
- Way #3: Articulate Storyline →
- Way #4: Lectora →
- Way #5: Easygenerator →
- Way #6: TalentLMS →
- 7 Tips for Effective PDF to SCORM Conversion →
What is SCORM?
SCORM, an acronym for Shareable Content Object Reference Model, is a universally recognized standard for e-learning content. It’s a set of technical specifications and guidelines that allows e-learning courses and Learning Management Systems (LMS) to communicate with each other. In simpler terms, SCORM ensures that e-learning content can be easily shared, tracked, and reused across different platforms without compatibility issues. You can read our SCORM guide for more information about the format.

SCORM courses, then, are e-learning modules or content packages that adhere to these SCORM standards. Unlike traditional digital documents or videos, SCORM courses are interactive and trackable. They can include multimedia elements like videos, animations, quizzes, and simulations. More crucially, they can capture and report detailed data, such as a learner’s progress, assessment scores, time spent, and interactions within the course. This data can then be relayed to an LMS, providing educators with valuable insights into a learner’s journey. To learn more about creating SCORM packages, check out our dedicated article.
Convert PDF, MP4, HTML, Word, and PPT to SCORM Format with iSpring Suite
 Create SCORM files and convert various document formats into online mobile-friendly courses for LMS.
In essence, a SCORM course is more than just digital content; it’s a dynamic and interactive learning experience. When educators opt for SCORM-compliant courses, they’re choosing a format that not only enriches the learner’s experience but also provides detailed analytics, aiding in continuous improvement and personalized learning pathways.
The 6 Benefits of Converting PDF to SCORM
Transitioning from PDF to SCORM offers numerous benefits. Here are a few noteworthy ones:
- Interactivity: Unlike static PDFs, SCORM packages can incorporate interactive elements like quizzes, simulations, drag-and-drop activities, and multimedia components, offering a richer learning experience.
- Tracking & Reporting: SCORM-compliant courses interact with Learning Management Systems (LMS) to monitor learners’ progress, record completion rates, track quiz scores, and more, enabling educators to assess learner performance comprehensively.
- Standardization: SCORM is an e-learning industry standard. Producing SCORM-compliant content ensures it’s compatible across various LMS platforms, reducing the need for custom course modifications for individual systems.
- Engagement: With the potential to incorporate multimedia like videos and interactive simulations, SCORM content can be more captivating than a standard PDF.
- Protection from Being Copied: Texts within PDFs can be copied effortlessly, unless it’s a scanned document. Once converted to SCORM format, this copying capability is disabled. Users can view the material but are restricted from copying or editing it.
- Feedback Mechanisms: SCORM courses often provide instant feedback, such as immediate test results, empowering learners to pinpoint areas they might need to improve upon.
Let’s explore six effective strategies for converting PDF documents into SCORM-compliant content.
Way #1: iSpring Suite
iSpring Suite is an e-learning authoring toolkit that helps in creating SCORM-compliant courses. Here’s how you can use it:
1. Installation
Download the iSpring Suite free trial. Install the toolkit on your computer.
2. Accessing PDF Conversion Feature
Launch iSpring Suite. Click on the “Books” tab. To open your PDF document, either click on the “Browse” button or choose “PDF” in the “Create From” section.

3. Preview the Conversion
Once you’ve loaded the PDF, click on the “Preview” button. Choose a device and screen orientation (e.g., desktop, smartphone, tablet) to see how the converted content will appear on various devices.

4. Publishing Options
Click the “Publish” button. Navigate to the “LMS” tab to view all the LMS-related publishing options.
5. File Settings
Name your file and decide where it’ll be saved on your computer. Customize the quality of your conversion. You can: Select a preset ranging from high to low quality. Adjust the image compression or use the image quality slider for finer control. If desired, add a password to protect your file. This ensures that only individuals with the password can access the content. Determine which eLearning standard you’ll publish for. iSpring Suite supports multiple standards such as SCORM 1.2 and 2004, AICC, Experience API, and cmi5. Customize your chosen standard. For instance, if you choose SCORM 1.2: change the course name, write a course description, and add relevant keywords for better indexing.

6. Final Publishing
Click on “Publish” once again after making all desired changes. This will produce a ZIP file which is compatible and ready for uploading to any LMS platform. Upload your newly created SCORM course to your Learning Management System.
For a more comprehensive understanding of the PDF to SCORM conversion process, consider watching this video. It can provide visual insights and step-by-step guidance on how to achieve this transformation effectively:
Why I Like It
- User-friendly: iSpring Suite offers a straightforward and user-friendly interface, making it suitable for beginners.
- PDF Conversion: It includes PDF to SCORM conversion, which is especially useful if your source content is in PDF format.
- Device Preview: iSpring Suite allows you to preview your content on various devices to ensure responsiveness.
- Multiple SCORM Standards: It supports multiple SCORM standards, providing flexibility to cater to different Learning Management Systems.
Drawbacks of This Method
- Limited Interactivity: While it can convert text and images, it may not be as powerful as other tools for adding advanced interactive elements.
- Cost: iSpring Suite is a paid software, which may be a drawback for those on a tight budget.
- Offline Usage: You need to install the software on your computer, making it less convenient for collaborative, cloud-based work.
Who Is This Method Best For: Teachers who are beginners or have limited experience in e-learning development, those who require a quick conversion of PDFs to SCORM, and educators who prefer desktop software over cloud-based solutions.
Way #2: Adobe Captivate
Adobe Captivate stands out as an industry-leading e-learning software, adept at crafting SCORM-ready modules. Delve into this guide to seamlessly transform your PDF materials into an interactive course using Captivate:
1. Installation & Setup
Purchase and install Adobe Captivate from the official Adobe website. Launch the software and choose to create a new project or use a template.
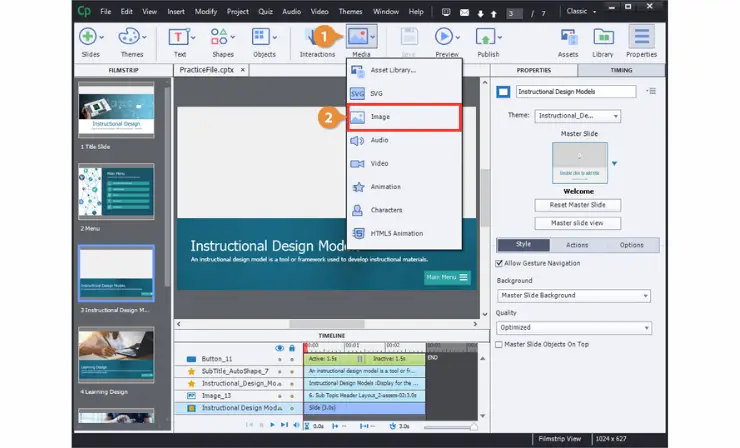
2. Import PDF Content
Convert the PDF pages into images using tools like Adobe Acrobat or online converters. In Captivate, select “Media” > “Image” to add the converted images.
3. Enhance the Content
Use Captivate’s tools to add interactions, such as click-to-reveal, drag-and-drop, quizzes, etc. Add multimedia elements like audio, video, and animations as needed. You can add buttons, action triggers, and slides to allow learners to navigate through the content.

4. SCORM Settings
Go to “File” > “Publish Settings” and select SCORM as your output format. Configure SCORM settings according to your LMS requirements (e.g., SCORM 1.2 or SCORM 2004).

5. Publish
Click on “Publish” to create the SCORM package. Save the output package to a location on your computer. Log in to your LMS and upload the SCORM package you created.
To gain a deeper understanding of Adobe Captivate as an authoring tool, I recommend watching this video. It can offer valuable insights into Captivate’s features and capabilities:
Why I Like It
- Comprehensive Interactivity: Adobe Captivate excels in creating highly interactive and engaging e-learning content.
- PDF Conversion: Although it requires you to convert PDFs to images, it’s a versatile tool for transforming various types of content into SCORM courses.
- SCORM Support: Adobe Captivate offers robust SCORM support, including customization for different standards.
- Industry-Leading: It’s widely used in the e-learning industry and offers extensive resources and a strong community for support.
Drawbacks of This Method
- Learning Curve: Adobe Captivate can be complex for beginners, and it may require time to learn the features.
- Cost: It’s a premium tool, which can be expensive for individual users or small organizations.
- Resource-Intensive: It might require a powerful computer to handle resource-intensive projects.
Who Is This Method Best For: Those with limited e-learning development experience, while experienced e-learning developers, instructional designers, organizations, or individuals seeking to create highly interactive and engaging e-learning content, and those willing to invest in a long-term e-learning development tool.
Way #3: Articulate Storyline
Articulate Storyline is renowned for its intuitive design interface, making SCORM course creation a breeze. Follow this comprehensive walkthrough to weave your PDF content into an engaging learning experience with Storyline:
1. Installation & Setup
Purchase and install Articulate Storyline from the official Articulate website. Open the software and start a new project.
2. Import PDF Content
Convert your PDF content into images. In Storyline, go to “Insert” > “Picture” and select the images you’ve created from the PDF.

3. Enhance the Content
Use Storyline’s intuitive interface to add interactive elements. You can add quizzes, simulations, and more. Utilize multimedia features like adding audio narrations, videos, and animations.

4. Add Navigation
Use triggers, states, and layers to create interactive navigation for your learners.
5. SCORM Settings
Click on “Publish” and choose “LMS” as your publishing option. Under the “Output Options,” select SCORM (1.2 or 2004) and configure other settings as needed.
6. Publish
Click on the “Publish” button to generate your SCORM package. Save the SCORM package to your computer. Log into your Learning Management System. Upload the SCORM package you’ve created with Articulate Storyline.

For a more comprehensive understanding of Articulate Storyline as an authoring tool, I recommend watching this video. It provides valuable insights into Storyline’s features and capabilities:
Why I Like It
- User-Friendly: Articulate Storyline has an intuitive interface that makes it accessible for both beginners and experienced users.
- Rich Interactivity: It offers a wide range of interactive elements and templates, making it suitable for creating engaging courses.
- SCORM Compatibility: It supports SCORM 1.2 and SCORM 2004, ensuring compatibility with most LMSs.
- Strong Community: There’s a strong user community and extensive online resources for help and support.
Drawbacks of This Method
- Cost: Like other professional e-learning authoring tools, Articulate Storyline comes at a premium price.
- Learning Curve: While it’s user-friendly, there is still a learning curve, especially for complex projects.
- Limited Free Trial: The free trial is limited in terms of duration and features.
Who Is This Method Best For: Instructional designers and e-learning developers with varying skill levels, organizations in search of a versatile and user-friendly authoring tool, and users who seek a balanced combination of features and ease of use.
Way #4: Lectora
Lectora is a powerful e-learning authoring tool that can help create SCORM-compliant courses. Here’s a step-by-step guide to incorporating content from a PDF into a course created using Lectora:
1. Create a New Project
Launch Lectora on your computer. Upon opening, select “File” from the menu, and then choose “New Project.” You can either start with a blank project or use one of the built-in templates.
2. Define Project Settings
Input basic information about your project, such as title, description, and author.
3. Insert PDF Content
Since Lectora doesn’t natively embed PDF files directly as readable content, you’ll want to convert each PDF page to an image or extract the text.
- To insert images: Go to “Insert” -> “Image” and select your converted PDF images.
- To insert text: Simply copy text from your PDF and paste it into text boxes in Lectora.

4. Organize and Design Your Course
Use chapters, sections, and pages in Lectora to structure your course. Customize the design using themes or create your own using tools and features in Lectora.
5. Add Interactivity and Multimedia
Incorporate interactive elements such as quizzes, buttons, actions, and multimedia components (videos, audio clips) to enhance the learner experience. Use the “Insert” option from the menu to explore the various interactive elements you can add.

6. Test Your Course
Preview your course regularly to ensure it appears and functions as intended. Lectora has a “Preview” option that allows you to see how the course behaves in a browser setting.
7. Set Publishing Options for SCORM
Go to “File” -> “Publish.” Choose the “SCORM” option and select your desired SCORM version (e.g., SCORM 1.2, SCORM 2004). Configure any additional settings, such as tracking and reporting options.
8. Publish Your Course
Once you’ve selected and configured all the necessary options, click on the “Publish” button. Lectora will generate a SCORM-compliant ZIP package. Log into your Learning Management System (LMS) and upload the SCORM ZIP package you’ve just created. Once uploaded, the course should be available for learners to access, and you can begin tracking their progress.
View this video to explore the fundamental capabilities of Lectora:
Why I Like It
- High Customization: Lectora offers extensive customization options for course design and interactivity.
- Multiple Input Options: It allows you to insert text and images directly or convert PDF content into images for inclusion.
- SCORM Support: Lectora supports various SCORM standards, making it compatible with different Learning Management Systems.
- Powerful Interactivity: It’s suitable for developing highly interactive e-learning content.
Drawbacks of This Method
- Learning Curve: Lectora can be complex for beginners, and it may take time to master its features.
- Cost: It’s a paid tool, which may be expensive for individual users or small organizations.
- Resource-Intensive: Complex projects might require a robust computer for smooth operation.
Who Is This Method Best For: Teachers will find this method ideal if they require high levels of customization and interactivity, if they or their organizations are willing to invest in a comprehensive authoring tool, and if they work with diverse content types beyond PDFs.
Way #5: Easygenerator
Easygenerator is a cloud-based e-learning authoring tool that enables users to design and publish courses quickly. Here’s a step-by-step guide to help you convert content, such as from a PDF, into a SCORM package using Easygenerator:
1. Start a New Course
If you’re new to Easygenerator, sign up for an account. If you already have an account, simply log in. Once logged in, click on the “Create a new course” option.

2. Course Details
Easygenerator offers several templates for courses, assessments, and learning paths. Choose a template that suits your content and objectives. Provide a title for your course and a description if necessary.
3. Import PDF Content
While Easygenerator doesn’t directly import PDF content, you can easily copy text from your PDF and paste it into the content blocks in Easygenerator. If your PDF has images, extract them from the PDF using tools or manually, and then upload them to Easygenerator using the image upload feature.

4. Design and Structure
Organize your content into sections or modules. This ensures logical flow and improves user navigation. Use the rich text editor to format the content, add links, and more.
5. Add Interactivity
Incorporate questions, quizzes, or interactive elements to make the learning experience more engaging. Easygenerator supports multiple question types including multiple-choice, fill in the blanks, and drag and drop.
6. Preview
Regularly preview your course to see how it appears to learners. This helps you ensure that everything works as intended.
7. Publish
Go to the ‘Publish’ or ‘Export’ section. Select ‘SCORM’ as the export format. You’ll typically have options like SCORM 1.2 or SCORM 2004 depending on your LMS requirements. Once you’re satisfied with the course, click on the “Publish” or “Export” button. Your course will be packaged into a SCORM-compliant ZIP file. Log in to your Learning Management System (LMS) and upload the SCORM ZIP file you generated from Easygenerator. Test the course within the LMS to ensure everything functions correctly.

For a clearer grasp of the process of converting PDF to SCORM using Easygenerator, consider watching this video:
Why I Like It
- Cloud-Based: Easygenerator is cloud-based, making it accessible from any device with an internet connection.
- Simplicity: It’s designed to be user-friendly and doesn’t require extensive training or experience.
- SCORM Support: Easygenerator supports SCORM standards for integration with LMSs.
- Collaborative: It allows for collaborative course creation and content sharing.
Drawbacks of This Method
- Limited PDF Integration: It doesn’t directly import PDFs, which means you’ll need to manually copy and paste text and convert images separately.
- Limited Interactivity: While it’s user-friendly, it may have limitations in terms of complex interactive elements.
- Limited Free Plan: The free plan may have restrictions on the number of courses and learners.
Who Is This Method Best For: Teachers who are new to e-learning content creation, for educators in small organizations with budget limitations, and for users who favor collaborative, cloud-based tools.
Way #6: TalentLMS
TalentLMS is primarily a Learning Management System (LMS) with integrated course authoring capabilities. While TalentLMS doesn’t directly convert PDFs into SCORM packages, you can use it to create courses that include content from PDFs. Here’s a step-by-step guide on how to do that:
1. Create a New Course
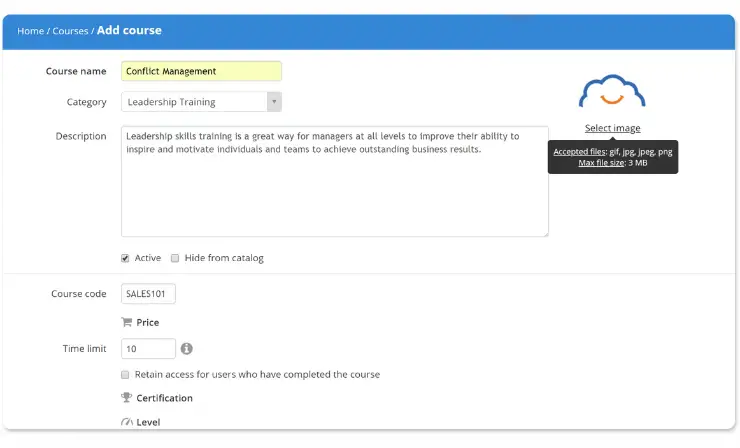
If you’re new to TalentLMS, create an account. If you already have an account, log in. Once logged in, you’ll be directed to the dashboard. Here, you’ll see a list of courses (if any exist) and various management options. Click on the “Add Course” button (often found at the top or side menu). Fill in the course details such as name, category, description, and other relevant information.
2. Upload PDF
Inside the course editor, choose “Add” or “Add Content”. From the content type dropdown, select “File”. Browse your computer for the desired PDF file and upload it. Once uploaded, the PDF will be available as a learning resource within the course. Learners can click on it to view and download.
3. Add Additional Learning Elements
Beyond just PDFs, you can integrate quizzes, assignments, videos, SCORM/xAPI content, and other interactive elements to enhance the learning experience. Use the “Add” or “Add Content” option as before, but select different content types.

4. Set Up Course Structure
Organize the content in logical sequences or modules. Use sections or learning paths to group related content.
5. Configure Course Settings
Determine course availability: Decide if it’s open to all or invitation-only. Set up course completion criteria, such as passing grades for quizzes or mandatory content viewing.
6. Preview and Test
Before releasing the course to learners, preview it to ensure everything appears as intended. Consider enrolling a few test users or colleagues to gather feedback.
7. Publish the Course
Once you’re satisfied with the course setup, make it “Active” or “Available” so that your target audience can access it.
Additionally, there’s a video available on how to create SCORM courses in TalentLMS:
Why I Like It
- Cloud-Based LMS: TalentLMS is a cloud-based Learning Management System with integrated course authoring capabilities, making it convenient for managing courses and learners.
- Variety of Content Types: TalentLMS allows you to incorporate various content types, including PDFs, quizzes, and SCORM packages.
- Ease of Use: It’s user-friendly and suitable for those who want a simple and accessible platform.
Drawbacks of This Method
- Limited PDF Conversion: TalentLMS doesn’t directly convert PDFs into SCORM packages. You need to upload the PDF and manage it as a resource rather than converting it into interactive content.
- Limited Interactivity: While you can create quizzes and assessments, it may not offer the same level of interactivity as dedicated authoring tools.
- LMS Focus: TalentLMS is primarily an LMS with authoring capabilities, so it may not have the advanced authoring features of standalone e-learning authoring tools.
Who Is This Method Best For: Teachers will benefit from this method if they are seeking an integrated LMS with fundamental course authoring functions, prefer a straightforward platform for course and learner management, or do not need extensive e-learning content development features.
7 Tips for Effective PDF to SCORM Conversion
Converting PDF to SCORM requires a thoughtful approach to ensure optimal learner experience and technical compliance. Here are some tips to keep in mind:
- Assess the Content: Not all content in your PDF may be suitable for an interactive SCORM package. Review the material and determine what’s essential, what can be transformed into interactive elements, and what might be omitted.
- Prioritize Interactivity: Take advantage of SCORM’s ability to be interactive. Convert static information from the PDF into quizzes, drag-and-drops, clickable elements, or simulations.
- Optimize for Mobile: Many learners access courses on tablets and smartphones. Ensure the SCORM package is responsive and provides a seamless experience across all devices.
- Use Clear Navigation: Organize content logically. Offer a table of contents, clear navigation buttons, and breadcrumbs so learners can easily move through the material.
- Enhance with Multimedia: Where possible, enrich the content with audio, video, and animations. This can make the learning experience more engaging compared to the static PDF.
- Test Thoroughly: Before deploying your SCORM package to learners, test it in different environments, on different devices, and within the intended LMS to ensure compatibility and functionality.
- Revisit Accessibility: Ensure that the SCORM package is accessible to all users, including those with disabilities. This might involve adding alt-text to images, subtitles to videos, or keyboard navigation.
Remember, the goal of converting PDF to SCORM is not just about technical transformation but also about enhancing the learning experience. Always prioritize the learner’s needs and the learning objectives when undertaking this process.
Useful Resources
- 5 Ways to Convert MP4 to SCORM
- 7 Ways to Convert PowerPoint to SCORM
- Benefits of SCORM by Rustici Software
- SCORM Overview by ADL Initiative
- SCORM Cloud for Testing SCORM Courses
Conclusion
In embracing the digital shift, educators have the opportunity to transform static PDFs into dynamic SCORM modules, enhancing the learning experience. By understanding the conversion techniques and applying the provided tips, teachers can effectively harness SCORM’s capabilities, fostering a more interactive and measurable learning journey for their students. Dive into this digital transformation and elevate your teaching methods.
Simona Johnes is the visionary being the creation of our project. Johnes spent much of her career in the classroom working with students. And, after many years in the classroom, Johnes became a principal.
Follow Simona: ![]()
![]()
![]()
![]()
- 5 Steps to Start Online Teaching - February 15, 2026
- Overview of 22 Low-Code Agencies for MVP, Web, or Mobile App Development - October 23, 2024
- Tips to Inspire Your Young Child to Pursue a Career in Nursing - July 24, 2024