In today’s technologically-driven educational landscape, the role of e-learning has never been more pronounced.
For teachers, the challenge often lies in transforming traditional classroom materials into engaging digital courses. This transition, though seemingly complex, is made smoother by utilizing the SCORM (Sharable Content Object Reference Model) standard. SCORM ensures that e-learning content can be seamlessly shared across various learning management systems (LMS), giving educators the flexibility to use their courses on different platforms without hiccups.

If you’ve found yourself with a Word document brimming with invaluable content but are unsure about its digital metamorphosis, you’re in the right place. This comprehensive guide unravels the intricate process of converting Word documents into SCORM-compliant courses, outlining both manual and software-aided approaches.
By the end of this article, you will not only possess the knowledge to leverage tools like iSpring Suite, Adobe Captivate, Articulate Storyline, and Lectora, but also have gleaned crucial tips to elevate your e-learning content’s effectiveness.
So, whether you’re a seasoned digital educator or a classroom teacher treading the e-learning waters for the first time, this guide aims to empower you with the expertise to deliver impactful digital courses. Let’s dive in and explore the transformational journey from Word to SCORM.
On this page, you’ll discover:
- What is SCORM? →
- 5 Ways to Convert Word to SCORM:
- Way #1: Manual Conversion →
- Way #2: iSpring Suite →
- Way #3: Adobe Captivate →
- Way #4: Articulate Storyline →
- Way #5: Lectora →
- 7 Tips for Turning Word Documents into SCORM →
What is SCORM?
SCORM, which stands for Sharable Content Object Reference Model, is a set of standards and specifications that enable the creation and delivery of e-learning content. SCORM courses are a fundamental component of modern online education and training. You can read our article for more information about the SCORM format.

SCORM-compliant courses are designed to be versatile and interoperable, ensuring that they can seamlessly integrate with various Learning Management Systems (LMS). These courses are created using e-learning authoring tools and can encompass a wide range of content, including text, multimedia, assessments, and interactive elements.
One of the key features of SCORM courses is their ability to track and report learner progress and performance. This means that educators and administrators can monitor how students interact with the content, assess their understanding, and identify areas where improvement is needed.
SCORM courses offer flexibility, as they can be accessed on various devices and platforms. They promote consistency in e-learning content delivery, making them an invaluable tool for organizations, educational institutions, and trainers looking to provide structured and trackable online learning experiences. In the ever-evolving landscape of digital education, SCORM continues to play a pivotal role in shaping the future of e-learning.
Convert PDF, MP4, HTML, Word, and PPT to SCORM Format with iSpring Suite
 Create SCORM files and convert various document formats into online mobile-friendly courses for LMS.
Here are five successful methods to transform Word documents into SCORM-compliant content:
Way #1: Manual Conversion
Manually converting your course to SCORM is a comprehensive approach that allows for high customization and interactivity. Here’s how you can do it step by step:
1. Convert to HTML
Structure your course using Google Docs and opt for “File” → “Download” → “Web Page” to generate the HTML variant of the course.

2. Structure Your Material
Arrange your HTML data in a manner that aligns with e-learning requirements. This could mean creating distinct web pages for various topics or sections.
3. Embed Necessary SCORM Components
In this step, you’ll craft text documents that detail your course in the SCORM format. These are then merged with your earlier crafted HTML materials into a ZIP bundle. This ensures your LMS comprehends the course and records user interactions correctly. A recommended procedure includes:
- Acquire the SCORM 2004 Basic Run-time Package directly from the SCORM official website.
- Scrutinize the provided file layout, noting the arrangement of the HTML data in tandem with the SCORM documents reflecting it.

- Incorporate specific documents (like Adlcp_rootv1p2.xsd, Ims_xml.xsd, among others) into your HTML course design.

- Refine the imsmanifest.xml document to correlate with your material, tweaking elements like the title and associated HTML resource links.

4. Compile Everything into a ZIP file
Merge your personalized imsmanifest with the respective HTML and SCORM components into a single ZIP package. This consolidated file can then be transferred to your preferred platform for assessment.
5. Upload to LMS
Log in to your LMS and upload the SCORM package, following your LMS’s import or course creation process. For more ways to convert HTML to SCORM, check out our article.
Why I Like It
- No Additional Costs: Using tools you already have, like Word or a basic text editor, means no new software expenses.
- Full Control: You dictate every aspect of the design and functionality.
- No Restrictions: Without the constraints of software templates, your creativity isn’t boxed in.
- Universality: Skills learned during manual conversion can be applied across multiple platforms.
Drawbacks of This Method
- Time-Consuming: Without specialized tools, the process can be lengthy.
- Potential for Errors: Manual conversions might lead to inconsistencies or missed elements.
- Limited Interactivity: Creating complex interactions or animations can be challenging.
- Technical Skills: Requires deeper knowledge in coding and e-learning standards.
Who Is This Method Best For: Tech-savvy educators who want maximum control over their content, those on a tight budget, and those who value the learning experience of manual conversion.
Way #2: iSpring Suite
iSpring Suite is a user-friendly desktop tool that simplifies the conversion of Word documents to SCORM. Follow these steps to create your SCORM course with ease:
1. Launch iSpring Suite and Import Your Word Document
Start iSpring Suite, navigating to the Books section. Opt for “MS Word” under the “Create From” category, or utilize the “Browse” function to access your file.

2. Preview and Choose Device and Screen Orientation
Click “Preview,” then determine a device and screen positioning to evaluate the appearance of your SCORM module on various devices like PCs, smartphones, or tablets.

3. Customize File Settings and Quality Options
Press the “Publish” option. Several destination categories will appear. For Word to SCORM conversion, opt for the “LMS” category. Here, fine-tuning your output preferences is possible. Consider renaming your file and designating a target directory for storage. Next, proceed to configure quality settings. Opt between an array of predefined quality levels, ranging from high to low, or establish a personalized preset by setting the desired image compression level or manipulating the quality indicator. For exclusive access to your SCORM module, establishing a security password is advisable.

4. Select SCORM Standard and Profile Settings
Select an appropriate standard (SCORM 1.2 or SCORM 2004) supported by your educational platform from the LMS profile options. Post selection, additional customizations are available. These include modifying your course’s headline, incorporating a summary, and embedding keywords for enhanced accessibility.

5. Save Settings and Publish Your SCORM Course
Preserve the configured settings and activate the “Publish” command. iSpring Suite will then generate a compressed module. Proceed by uploading your course to a compatible SCORM LMS, enabling efficient monitoring of user engagement and achievements.
Why I Like It
- User-friendly: Offers a straightforward and intuitive interface, suitable for beginners.
- Device Preview: Allows for content previews on different devices to ensure optimal responsiveness.
- Multiple SCORM Standards: Compatible with a variety of SCORM standards, catering to different Learning Management Systems.
- Integrated Quizzes: You can create interactive quizzes and assessments directly within the tool.
Drawbacks of This Method
- Limited Interactivity: While adept at converting text and images, it might not offer the complexity of other tools for interactive elements.
- Cost: As a premium software, it might be beyond the budget for some.
- Offline Usage: Requires software installation on the computer, potentially hindering collaborative, cloud-based efforts.
- Customization: Some users might find template options limiting if they want a highly customized design.
Who Is This Method Best For: Novice teachers or those with limited e-learning development experience, educators needing rapid conversion from PDFs to SCORM, and those who favor desktop software over cloud-based solutions.
For a more in-depth understanding of the Word to SCORM conversion process using iSpring Suite, consider viewing this accompanying video:
Way #3: Adobe Captivate
Converting a Word document to SCORM format using Adobe Captivate involves several steps. Here’s a step-by-step guide:
1. Open Adobe Captivate
Launch Adobe Captivate and choose to create a new project or use a template if available.
2. Import Word Document
Convert the Word document into images or plain text. You can use Adobe Acrobat or an online converter for this purpose. In Adobe Captivate, select “Media” and then choose “Image” to import the converted images or “Text” if you have extracted text.

3. Enhance the Content
Use Adobe Captivate’s built-in tools and features to add interactivity to your course content. This can include click-to-reveal interactions, drag-and-drop exercises, quizzes, and more. Add multimedia elements like audio, video, animations, or simulations to enhance the learning experience. You can insert these elements using the “Insert” menu.

4. SCORM Settings
Navigate to the “File” menu and select “Publish Settings.” In the Publish Settings dialog box, select “SCORM” as your output format.
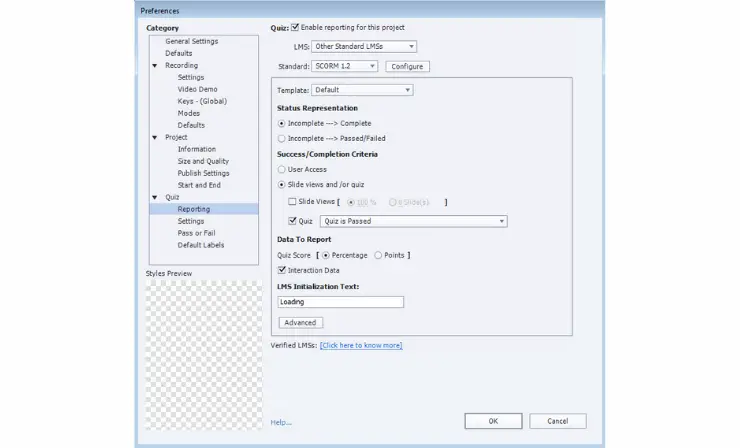
5. Configure SCORM Settings
Customize the SCORM settings according to your Learning Management System (LMS) requirements. This typically involves selecting the appropriate SCORM version (e.g., SCORM 1.2 or SCORM 2004) and specifying other settings like reporting options and completion criteria. You can change the title of your course, add a description, and enter relevant keywords in the SCORM settings to help with indexing and organization within your LMS.
6. Publish Your SCORM Package
Click on the “Publish” button to generate the SCORM package. You’ll need to specify where you want to save the output package on your computer. Follow your LMS instructions to upload the SCORM package you’ve just created in Adobe Captivate.
Why I Like It
- Versatility: Adobe Captivate supports a wide range of multimedia elements, from 360-degree images to VR interactions.
- Responsive Design: It offers fluid box design capabilities, ensuring content looks good on all device types.
- Advanced Interactions: You can create simulations, drag-and-drop interactions, quizzes, and more.
- Software Simulations: Great for creating realistic software demos.
Drawbacks of This Method
- Learning Curve: There is a steeper learning curve compared to some other tools.
- Cost: Adobe Captivate can be on the pricier side, especially for individual educators.
- Size: Projects can sometimes be larger in file size, affecting upload and download speeds.
Who Is This Method Best For: Experienced e-learning developers or those who need advanced interactivity and simulation features.
You can also watch this video for a comprehensive look at Adobe Captivate’s features:
Way #4: Articulate Storyline
Articulate Storyline offers a user-friendly interface for converting Word documents to SCORM. Here’s a step-by-step guide to help you get started:
1. Create a New Project
Launch Articulate Storyline and start a new project.
2. Import Word Document
Convert the Word document into images or plain text. You can use Adobe Acrobat or an online converter for this purpose. In Articulate Storyline, go to the “Insert” menu and choose “Picture” to import the converted images or “Text” if you have extracted text.

3. Enhance the Content
Use Articulate Storyline’s intuitive interface to add interactivity to your course content. This can include quizzes, simulations, drag-and-drop activities, or other interactions. Incorporate multimedia elements such as audio narrations, videos, animations, or simulations to enhance the learning experience. You can add these elements using the “Insert” menu.

4. Add Navigation
Use triggers, states, and layers in Articulate Storyline to create interactive navigation for your learners.
5. SCORM Settings
Click on the “Publish” button in the toolbar to open the “Publish” dialog. In the “Publish” dialog, select “LMS” as your publishing option. Under “Output Options,” select the appropriate SCORM version, either SCORM 1.2 or SCORM 2004, depending on your LMS requirements.

6. Publish Your SCORM Package
Once you’ve selected the necessary options, click the “Publish” button. Articulate Storyline will generate a SCORM package, and you can specify where you want to save it on your computer. Find the section for uploading or importing courses, and follow your LMS instructions to upload the SCORM package you’ve just created in Articulate Storyline.
Why I Like It
- Intuitive Interface: Similar to PowerPoint, making it accessible for most users.
- Dynamic Interactivity: It offers triggers, states, and layers to create custom interactions.
- Rich Multimedia Support: Allows you to integrate videos, animations, and other multimedia elements seamlessly.
- Community Support: A large community means plenty of resources and templates available.
Drawbacks of This Method
- Desktop Only: The software needs to be downloaded and installed, which can be limiting for some users.
- Cost: It’s a premium tool with associated costs.
- Updates: Periodic updates sometimes change the interface or functionality, requiring relearning.
Who Is This Method Best For: Educators who have some experience with e-learning tools or those who are familiar with PowerPoint. Ideal for those looking for a balance between ease-of-use and advanced features.
Dive into Articulate Storyline’s capabilities by viewing this detailed video guide:
Way #5: Lectora
Lectora is a versatile e-learning authoring tool for creating SCORM-compliant courses. Here’s a guide to converting your Word documents to SCORM with Lectora:
1. Create a New Project
Launch Lectora on your computer. Select “File” from the menu, then choose “New Project.” You can start with a blank project or use one of the built-in templates.
2. Define Project Settings
Input basic information about your project, such as the title, description, and author.
3. Insert Word Content
Since Lectora doesn’t natively embed Word files as readable content, you’ll need to convert your Word document into images or text. To insert images: Go to “Insert” > “Image” and select the converted Word document images. To insert text: Simply copy text from your Word document and paste it into text boxes in Lectora.

4. Design Your Course
Use chapters, sections, and pages in Lectora to structure your course content. Incorporate interactive elements such as quizzes, buttons, actions, and multimedia components (videos, audio clips) to enhance the learner experience.

5. Test Your Course
Regularly preview your course to ensure it appears and functions as intended. Lectora has a “Preview” option that allows you to see how the course behaves in a browser setting.
6. Set Publishing Options for SCORM
Go to the “File” menu and select “Publish.” Choose the “SCORM” option as your export format. Select your desired SCORM version, such as SCORM 1.2 or SCORM 2004, depending on your LMS requirements. Configure any additional settings, such as tracking and reporting options.
7. Publish Your Course
Once you’ve selected and configured all the necessary options, click on the “Publish” button. Lectora will generate a SCORM-compliant ZIP package containing your course content. Upload the SCORM ZIP package to your LMS.
Why I Like It:
- Flexible Design: Offers both template-based and custom designs.
- Scripting and Variables: Great for those who want to add customized interactions or gamification elements.
- Accessibility Features: Built with accessibility in mind, making it great for creating inclusive content.
Drawbacks of This Method:
- Complexity: Has a lot of features that can be overwhelming for first-time users.
- Price: It’s one of the more expensive e-learning tools on the market.
- Aesthetic: Default templates may feel a bit outdated compared to newer tools.
Who Is This Method Best For: Advanced e-learning developers who want maximum flexibility and control over their course design, or institutions aiming to make their content as accessible as possible.
Explore the features of Lectora by tuning into this informative video tutorial:
7 Tips for Turning Word Documents into SCORM
To excel in converting Word documents into engaging SCORM-compliant e-learning courses, follow these seven essential tips:
- Plan Your Course Structure: Take time to plan the structure of your e-learning course. Break down your Word document into sections or modules that make sense for your learners. A clear and logical course structure will enhance the learning experience.
- Content Organization: Ensure that your Word document is well-organized. Use clear headings, subheadings, and bullet points to structure your content. This will make it easier to convert into an e-learning format.
- Choose the Right Authoring Tool: Select an e-learning authoring tool that aligns with your needs and proficiency. Some tools are more user-friendly, while others offer extensive customization and interactivity options.You can also explore our article that features a curated list of the top 21 authoring tools.
- Test and Revise: After you’ve converted your Word document to SCORM, thoroughly test the course. Check for any formatting issues, broken links, or interactivity problems. Revise as needed to ensure a smooth learning experience.
- User-Friendly Navigation: Ensure that the course has user-friendly navigation. Learners should be able to progress through the content easily, access different sections, and return to previous content when needed.
- Accessibility and Mobile Responsiveness: Consider accessibility standards to make your e-learning course inclusive. Also, ensure that your SCORM content is mobile-responsive to cater to learners on various devices.
- Backup Your Work: Regularly back up your work to prevent data loss. This is especially important in case of technical issues during the conversion process.
By following these tips, you can effectively convert Word documents into SCORM-compliant e-learning courses that engage and educate your learners.
Useful Resources
- Evaluate Your SCORM Modules using SCORM Cloud
- Introduction to SCORM by ADL Initiative
- Delving into SCORM with Rustici Software
Conclusion
In the evolving realm of e-learning, transforming Word documents into SCORM-compliant courses is vital. With the tools and strategies outlined in this guide, educators can confidently bridge the gap between traditional and digital learning. Embrace these methods to enrich your students’ online learning experience and ensure seamless integration with various learning platforms. Your digital education journey starts here.
Simona Johnes is the visionary being the creation of our project. Johnes spent much of her career in the classroom working with students. And, after many years in the classroom, Johnes became a principal.
Follow Simona: ![]()
![]()
![]()
![]()
- 5 Steps to Start Online Teaching - February 15, 2026
- Tips to Inspire Your Young Child to Pursue a Career in Nursing - July 24, 2024
- How Parents Can Advocate for Their Children’s Journey into Forensic Nursing - July 24, 2024